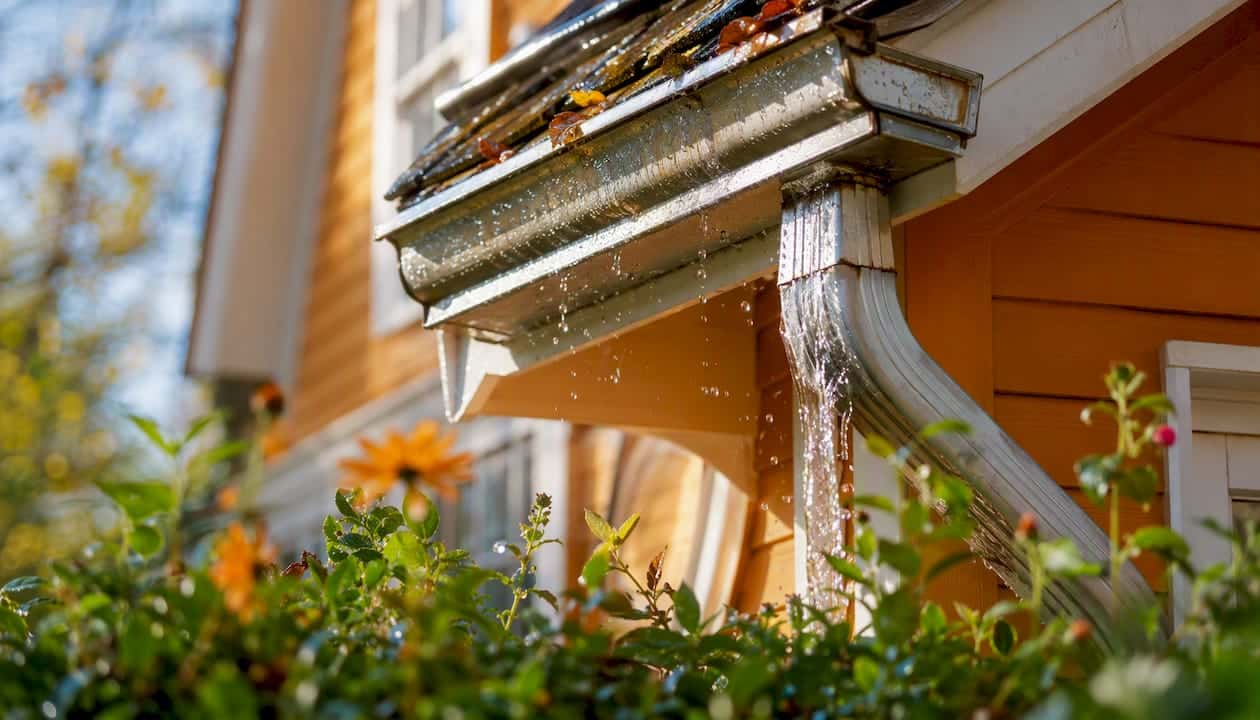
The fastest way to manage rainwater at home is to control roof runoff through well-maintained gutters and downspouts, capture excess in properly sized storage, add a first-flush diverter and screens, and route overflow away from your foundation. Do those four things and you’ve covered the core of residential rainwater harvesting.
Here’s the quick action list to start with:
- Clean gutters and downspouts before the rainy season and after major storms
- Install a downspout-to-barrel adapter to divert roof runoff into a rain barrel using a simple kit from any home improvement store
- Add a first-flush diverter to keep the dirtiest initial runoff out of your storage tank
- Screen every tank opening to block debris and mosquitoes
- Link multiple barrels with at least 1.5″ tubing for expanded capacity
- Route barrel overflow to a rain garden or dry well, not toward your foundation
- Raise barrels on a stable platform (cinder blocks work well) for gravity-fed irrigation
Pro Tip: Keep a mesh screen over every barrel opening — not just the inlet. Mosquitoes can breed in as little as a bottle cap of standing water, and an uncovered barrel becomes a problem fast.
Key Takeaways
A well-maintained gutter and downspout system, paired with properly sized storage and basic filtration, is the foundation of effective residential rainwater management.
| Point | Details |
|---|---|
| Gutters and downspouts first | Clean gutters twice yearly; pitch at 1/4″ per 10 ft; extend downspouts at least 5 ft from the foundation. |
| Size storage to your roof | 1″ of rain on 1,000 sq ft yields roughly 600 gallons — use that to size barrels or tanks before you buy. |
| First-flush diverter and screens | Install both before connecting any storage; they block the dirtiest runoff and prevent mosquito breeding. |
| Non-potable uses only | Use harvested rainwater for irrigation, washing, and permitted toilet/laundry use — never for drinking without certified treatment. |
| Larrysgutters for Central Florida | Larrysgutters installs seamless gutters, gutter guards, and downspout routing systems designed for Florida’s heavy wet season. |
Table of Contents
- How does residential rainwater harvesting actually work?
- Practical rainwater management tips for gutters and downspouts
- Which storage option fits your home?
- How do you keep stored rainwater clean and safe?
- What can you safely use harvested rainwater for?
- What does a rainwater system cost, and how long does it take?
- What’s the right maintenance schedule for a rainwater system?
- When should you hire a gutter or rainwater professional?
- Why Larry’s Gutters recommends these steps for Central Florida homeowners
- Larrysgutters can handle your gutter and rainwater system professionally
- Sources
How does residential rainwater harvesting actually work?
Three components make up every home rainwater system: the catchment surface (your roof), the conveyance (gutters and downspouts), and storage (barrels or cisterns). Rain hits the roof, flows into gutters, travels down the downspout, and enters your storage vessel. From there, you use it for irrigation, washing, or other non-potable tasks.
Sizing your storage starts with one reliable rule: 1 inch of rain on 1,000 square feet of roof yields roughly 600 gallons. In practice, losses from evaporation, splash, and first-flush diversion reduce that final captured volume somewhat, so plan on capturing somewhat less than the theoretical maximum per inch per 1,000 square feet.
Quick sizing example: A 2,000 sq ft roof during a 1-inch rain event can yield over a thousand gallons before losses. That’s 24 standard 50-gallon rain barrels — or one 1,200-gallon polyethylene tank. Most homeowners start with two to four barrels and expand from there.
What that means for your decisions: if your roof is 1,500 sq ft and you get a typical Central Florida summer storm dropping a couple of inches, you’re looking at a substantial amount of potential capture. A single 55-gallon barrel fills in minutes. Sizing up or linking barrels isn’t optional if you want meaningful storage.
Practical rainwater management tips for gutters and downspouts
Your gutters are the first place a rainwater system fails. A clogged or sagging gutter doesn’t just waste water — it sends runoff straight down your foundation wall.
Step-by-step gutter checklist
- Clean gutters at least twice a year — before the wet season (May in Central Florida) and after the dry season ends. After major storms, do a quick visual check.
- Check and correct pitch. Gutters should slope at least 1/4 inch per 10 feet toward the downspout. Standing water in gutters after rain means the pitch is off.
- Inspect hangers every 18–24 inches. Sagging sections pull away from the fascia and create low spots where debris collects.
- Upgrade to seamless gutters in high-rainfall areas. Sectional gutters have seams every few feet — each one is a potential leak. Seamless gutters, custom-fabricated on-site, eliminate most of those failure points.
- Size up if you’re overflowing. Standard 5-inch K-style gutters handle most homes, but a large roof or steep pitch in a heavy-rain region may need 6-inch gutters and larger downspouts.
- Extend downspouts at least 5 feet from the foundation — or connect them to underground drains or a rain garden. Short extensions that dump water at the base of your house are one of the most common causes of foundation saturation in Florida.
- Install a downspout adapter at the barrel connection point. Most kits include a diverter that sends overflow back down the downspout when the barrel is full.
Statistic callout: Gutters pitched below 1/4″ per 10 feet collect standing water, which accelerates corrosion, breeds mosquitoes, and reduces the clean catchment volume entering your storage system.
Pro Tip: Gutter guards cut cleaning frequency significantly and keep leaf debris out of your barrel. If you’re setting up a rainwater capture system, adding guards at the same time is worth the upfront cost — you’ll spend far less time maintaining both.
Signs your gutters need attention: water stains running down the siding (“tiger striping”), visible sagging from the ground, or pooling water at the foundation after rain. Any of those means the catchment side of your system is already losing water you could be storing.
Which storage option fits your home?
The right storage depends on how much water you want to capture, how much space you have, and what you plan to use the water for.
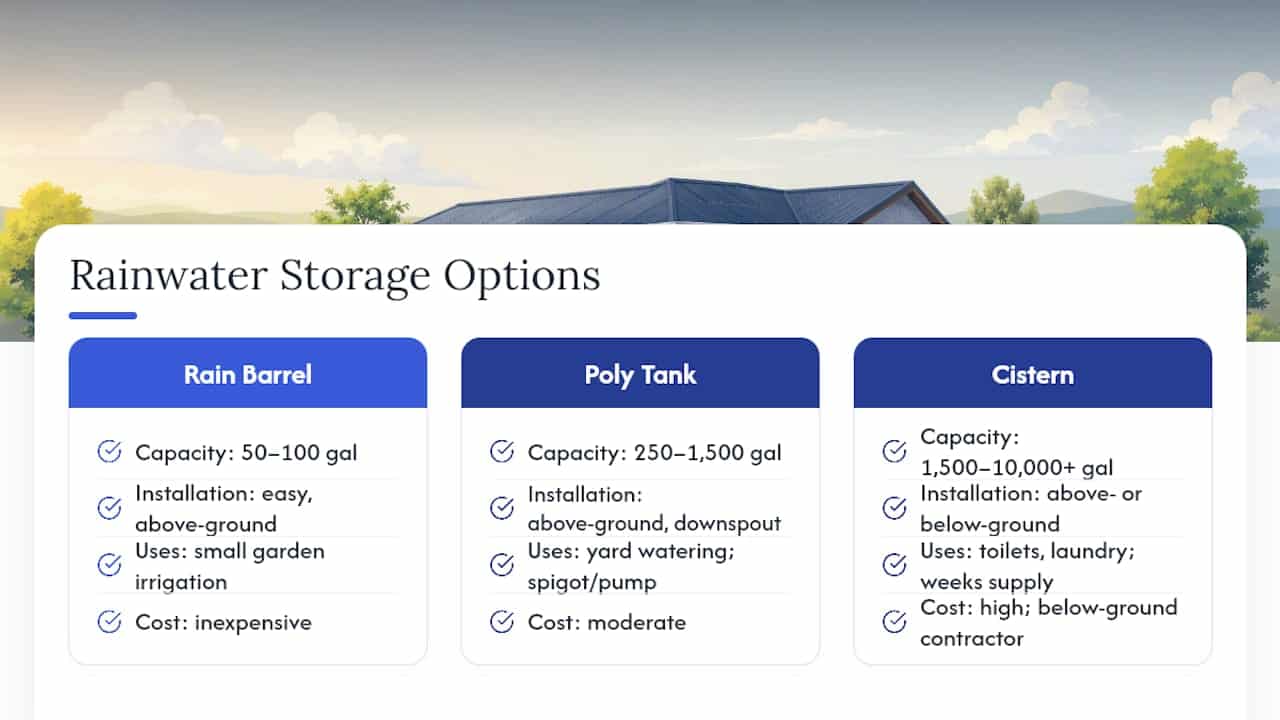
Rain barrels (50–100 gallons) are the entry point. They’re inexpensive, easy to install, and work well for small garden irrigation. The downside: they fill fast and run out faster. A single 55-gallon barrel empties in about 10 minutes of drip irrigation on a warm day.
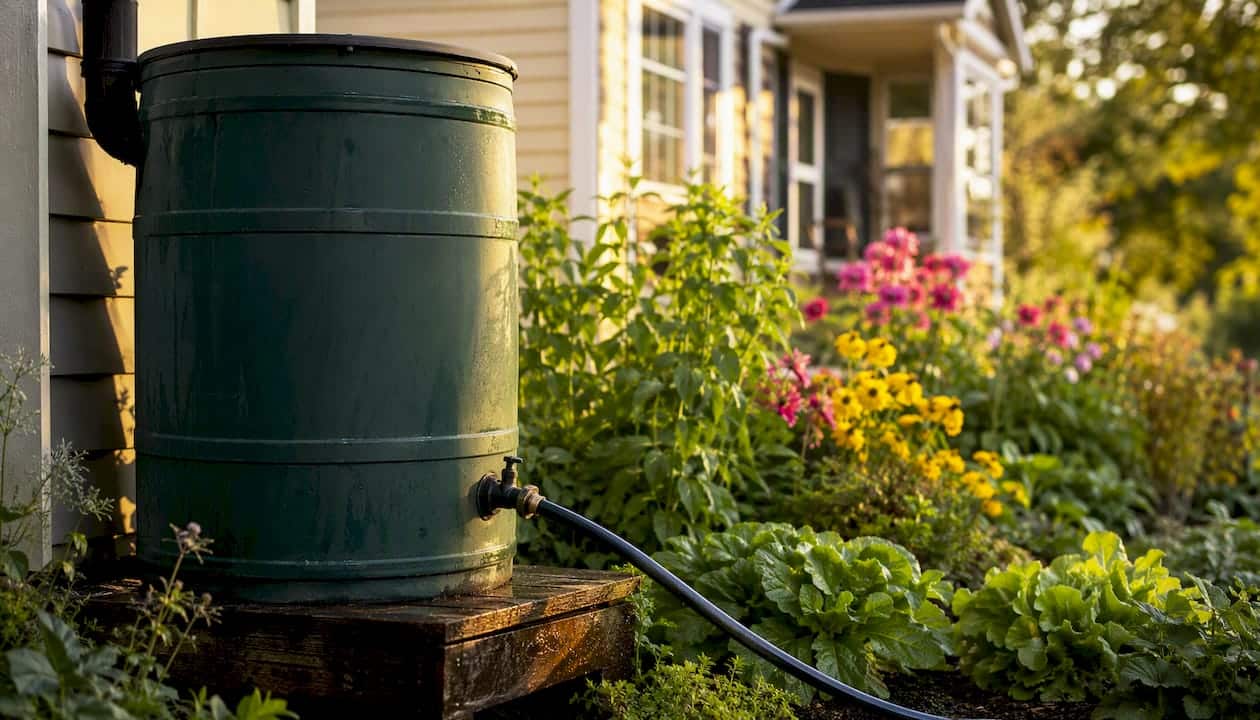
Polyethylene tanks (250–1,500 gallons) are the middle ground. They sit above ground, connect directly to a downspout, and can be screened and fitted with a spigot or pump. They cost more than barrels but store enough water to matter for a typical suburban yard.
Cisterns (1,500–10,000+ gallons) are for serious collection. Above-ground cisterns work like large polyethylene tanks. Below-ground cisterns require excavation and are typically a contractor job, but they’re invisible and can hold enough water to supply toilet flushing or laundry for weeks.
Figures based on the UF/IFAS 600-gallon-per-inch rule, before losses.
Linking multiple barrels with at least 1.5″ tubing — and adding an overflow outlet near the top of the last barrel — lets you expand capacity incrementally without committing to a large cistern upfront. Route that overflow to a rain garden planted with native species; it filters pollutants and keeps water away from your foundation. Linking small tanks is often more flexible and cost-effective than jumping straight to a large cistern, especially while you’re learning your actual demand.
Pro Tip: Elevate any barrel or tank on a stable platform — cinder blocks or a purpose-built stand — so gravity does the work. A barrel sitting on the ground requires a pump to get water to your garden hose.
How do you keep stored rainwater clean and safe?
Stored rainwater isn’t drinking water, but it still needs basic management to stay usable and to avoid creating a mosquito or algae problem.
Four steps to cleaner stored water
- Install a first-flush diverter. The first water off your roof after a dry spell carries the most dirt, bird droppings, and debris. A first-flush diverter captures that initial flow in a separate chamber and keeps it out of your storage tank. Most models drain automatically between rains.
- Screen every opening. Use fine mesh (at least 1/16″) over all inlets and vents. This blocks leaves, insects, and debris. Check screens after every storm — a clogged screen can back up flow and overflow the barrel.
- Add an inline sediment filter between the downspout and the tank if you plan to use the water for anything other than ground-level irrigation. A simple 50-micron filter removes most particulate matter.
- Control mosquitoes actively. Keep all openings screened. If you notice larvae, add a Bti (Bacillus thuringiensis israelensis) tablet — a biological larvicide that’s safe for plants and non-toxic to humans and pets. Rotate or empty barrels that sit unused for more than a week.
A UF/IFAS study of rain barrel water in South Florida found no E. coli present in samples, with nutrient levels acceptable for plant use. That’s reassuring, but the researchers note results vary by region and roof type — so don’t skip the screens and diverter just because the baseline looks good.
Rainwater is naturally soft, which makes it better for most plants than chlorinated municipal water. That softness also means it’s more susceptible to picking up whatever is on your roof, so the first-flush step matters more than most homeowners realize.
Pro Tip: Test your stored water once a year if you’re using it for anything beyond ground-level irrigation — especially if you have an older roof with moss or lichen. A basic water quality test kit from a hardware store checks for pH, bacteria, and nitrates in about 15 minutes.
Do not use stored rainwater for drinking, cooking, or filling a pool without proper treatment. Even with screens and diverters, roof-collected water is not potable without filtration and disinfection systems that go well beyond what a typical rain barrel setup provides.
What can you safely use harvested rainwater for?
Harvested rainwater works well for a range of non-potable uses. Here’s where it fits and where it doesn’t.
Recommended uses:
- Landscape and garden irrigation (the most common and straightforward use)
- Washing cars, driveways, and outdoor furniture
- Filling ornamental ponds and fountains
- Toilet flushing and laundry, where local plumbing codes permit and proper backflow prevention is installed
- Watering container plants and lawns with a drip or soaker system connected to a self-watering garden setup
Avoid these uses:
- Drinking or cooking without certified treatment systems
- Irrigating edible crops that contact the water directly (leafy greens, root vegetables) unless you’ve tested the water and confirmed safety
- Filling swimming pools without treatment
- Any connection to household potable plumbing without a certified backflow preventer and local code approval
Rainwater harvesting regulations vary by state and municipality. Most U.S. states now allow residential collection, but some cap storage volume or require permits for systems above a certain size. Check with your county’s water management district or building department before installing anything beyond a basic barrel setup. In Florida, the Southwest Florida Water Management District and St. Johns River Water Management District both actively encourage residential rainwater collection and publish guidance for homeowners.
What does a rainwater system cost, and how long does it take?
The cost range is wide because the scope varies so much. Here’s a realistic breakdown:
DIY rain barrel setup (1–2 barrels, basic diverter, screens):
- Materials: $75–$200
- Timeline: One afternoon
Mid-range polyethylene tank (250–500 gallons, inline filter, platform, overflow routing):
- Materials: $300–$800
- Professional installation (if needed): $200–$500 additional
- Timeline: One weekend DIY, or one day with a contractor
Full cistern system (1,500+ gallons, pump, pre-filtration, overflow to rain garden):
- Materials and installation: $2,000–$8,000+, depending on tank size, excavation (for underground), and plumbing integration
- Timeline: 1–2 weeks for a contractor, including permit processing
For gutter upgrades that support the catchment side, seamless gutter pricing varies by linear footage and material, but most residential jobs fall in the range of $4–$9 per linear foot installed.
When to hire a contractor instead of going DIY:
- Your roof is steep or more than one story — working near the roofline safely requires proper equipment
- The storage tank weighs more than 500 pounds when full (a 100-gallon barrel weighs over 800 lbs) — the platform needs to be engineered
- You want to connect to household plumbing for toilet flushing or laundry
- Significant grading or underground drainage work is involved
- Your municipality requires a permit — pulling permits yourself without experience adds risk
Get at least two written quotes. Ask each contractor to specify materials, tank size, overflow routing plan, and warranty terms in writing before signing anything.
What’s the right maintenance schedule for a rainwater system?
A rainwater system that isn’t maintained stops working — or worse, starts breeding mosquitoes and growing algae. The good news is that a basic schedule takes less than an hour a month.
Seasonal maintenance checklist
- Monthly (year-round): Check screens for clogs or tears; look for standing water around the base of barrels; confirm the overflow outlet is clear.
- Before wet season (April–May in Central Florida): Clean gutters thoroughly; flush downspouts; inspect first-flush diverter chambers and drain any accumulated sediment; check barrel platform stability.
- Mid-wet season (July–August): Drain and rinse barrels if water has been sitting more than two weeks without use; add a Bti tablet if you see any mosquito activity; check overflow routing after heavy storms.
- After wet season (October–November): Full system inspection — check tank seals, hose connections, and screen integrity; clean gutters again; flush the entire system before the dry season.
- Annually: Inspect the barrel or tank interior for algae or sediment buildup; scrub and rinse if needed; check all fittings for leaks; consider a water quality test if you’re using stored water for anything beyond ground irrigation.
For Florida homeowners, winterizing is rarely needed — but if you’re in a region with freezing temperatures, drain barrels completely before the first frost and disconnect downspout adapters to prevent ice damage.
Pro Tip: Keep barrels opaque or painted dark to block sunlight. Algae needs light to grow, and a translucent barrel left in direct sun will turn green within weeks. If your barrel is already clear, wrap it in burlap or paint it with exterior latex.
When should you hire a gutter or rainwater professional?
Some of this work is genuinely DIY-friendly. Some of it isn’t, and the consequences of getting it wrong range from wasted money to foundation damage.
Call a professional when:
- Your gutters are sagging, pulling away from the fascia, or leaking at multiple points — repairs may be a short-term fix when replacement is the better call
- You need gutters regraded or replaced on a two-story home
- You’re installing a tank heavier than 200 gallons and need a load-bearing platform
- You want to connect harvested water to household plumbing (toilet, laundry) — this requires a licensed plumber and backflow prevention
- Your property has drainage or grading issues that send water toward the foundation
- Your municipality requires a permit for the system you’re planning
Contractor checklist — ask before you hire:
- Are they licensed and insured in your state?
- Do they have experience with seamless gutter installation and gutter guard systems?
- Can they handle permit applications if required?
- Do they provide a written warranty on both materials and labor?
- Will they provide a written scope of work with specific materials listed?
Red flags in bids: vague line items (“miscellaneous drainage work”), no written warranty, unwillingness to pull permits, or a quote that comes in dramatically lower than others without explanation.
Pro Tip: Ask for the written scope before you agree to anything. A contractor who can’t describe exactly what they’re installing, where the overflow goes, and what happens if the system fails isn’t ready to do the job.
Why Larry’s Gutters recommends these steps for Central Florida homeowners
Central Florida gets an average of 50–60 inches of rain per year, most of it concentrated in a June–September wet season that can drop several inches in a single afternoon. That pattern creates two recurring problems we see regularly: foundation saturation from poorly routed downspouts, and erosion channels cut through yards by unmanaged overflow. Both are preventable with the right gutter and drainage setup.
The recommendations in this article reflect what actually works in that environment — not just general best practices, but the specific failure modes that show up on Central Florida homes. Seamless gutters handle the volume better than sectional systems. Gutter guards reduce the maintenance burden that Florida’s tree canopy creates. Properly sized downspouts and overflow routing protect foundations during the storms that matter most.
If you’re comfortable with the DIY steps above, start there. If the scope involves roof height, heavy storage, or drainage grading, that’s when a professional assessment pays for itself. For rainwater management specific to Central Florida conditions, the local context matters more than generic guides suggest.
Larrysgutters can handle your gutter and rainwater system professionally
If you’d rather have a professional handle the installation than spend a weekend on a ladder, Larrysgutters installs and services the gutter systems that make rainwater capture work properly from day one.

Larry’s Gutters specializes in seamless gutter installation custom-fabricated for your roofline, gutter guard installation to cut maintenance time, gutter cleaning and repair, and downspout routing designed to protect your foundation while feeding your capture system. For homeowners in the Gainesville area, local installation services are available with the same Central Florida expertise. Before your consultation, pull together a rough estimate of your roof area, a few photos of your current gutters and downspouts, and a note on what you want to capture or protect. Request a free quote at Larrysgutters and get a written scope before any work begins.
Sources
The sources below come from land-grant universities, state water management districts, and peer-reviewed extension publications — the most reliable starting points for homeowners who want technical detail, permit guidance, or deeper how-to instruction.
- Rainwater harvesting tips for beginners – AgriLife Today
- Saving and Using Rainwater – Solutions for Your Life – University of Florida, Institute of Food and Agricultural Sciences – UF/IFAS
- Rain Barrels
- ENH1376/EP640: Rain Barrel Water Quality in South Florida
