
TL;DR:
- Accurate roof measurements and pitch adjustments are essential to properly size gutters for Florida storms.
- Most Central Florida homes should consider six-inch gutters to handle intense rainfall safely.
- Proper downspout placement and safety margins are critical to prevent overflow and protect your home.
Getting your gutter measurements wrong in Central Florida is not just an inconvenience. It can mean flooded foundations, rotted fascia boards, and thousands in repair bills after a single afternoon storm. With 40 to 60 inches of annual rainfall hitting Lake, Marion, and Sumter counties every year, your gutters must be designed to handle intense, fast-moving rain events. This guide walks you through every step: gathering tools, calculating roof drainage area, choosing the right gutter size, and verifying your results before you buy a single foot of material.
Table of Contents
- Gather your tools and prep the site safely
- Calculate your roof drainage area accurately
- Determine the ideal gutter size for your home
- Avoid common mistakes and ensure accurate results
- A Florida pro’s perspective: What most guides miss about gutter measurements
- Ready for expert measuring or installation help?
- Frequently asked questions
Key Takeaways
| Point | Details |
|---|---|
| Measure roof drainage area | Measure each roof section’s length and width, adjust for pitch, and sum up the total for proper gutter sizing. |
| Choose gutters for Florida storms | Opt for gutters sized to handle high rainfall events common in Central Florida’s climate, usually 6-inch K-style or larger. |
| Prioritize safety and accuracy | Always use the right tools, follow safety protocols, and double-check measurements to avoid costly mistakes. |
| Plan for extreme weather | Add a safety margin and consider upsizing gutters for severe storms or hurricane conditions. |
Gather your tools and prep the site safely
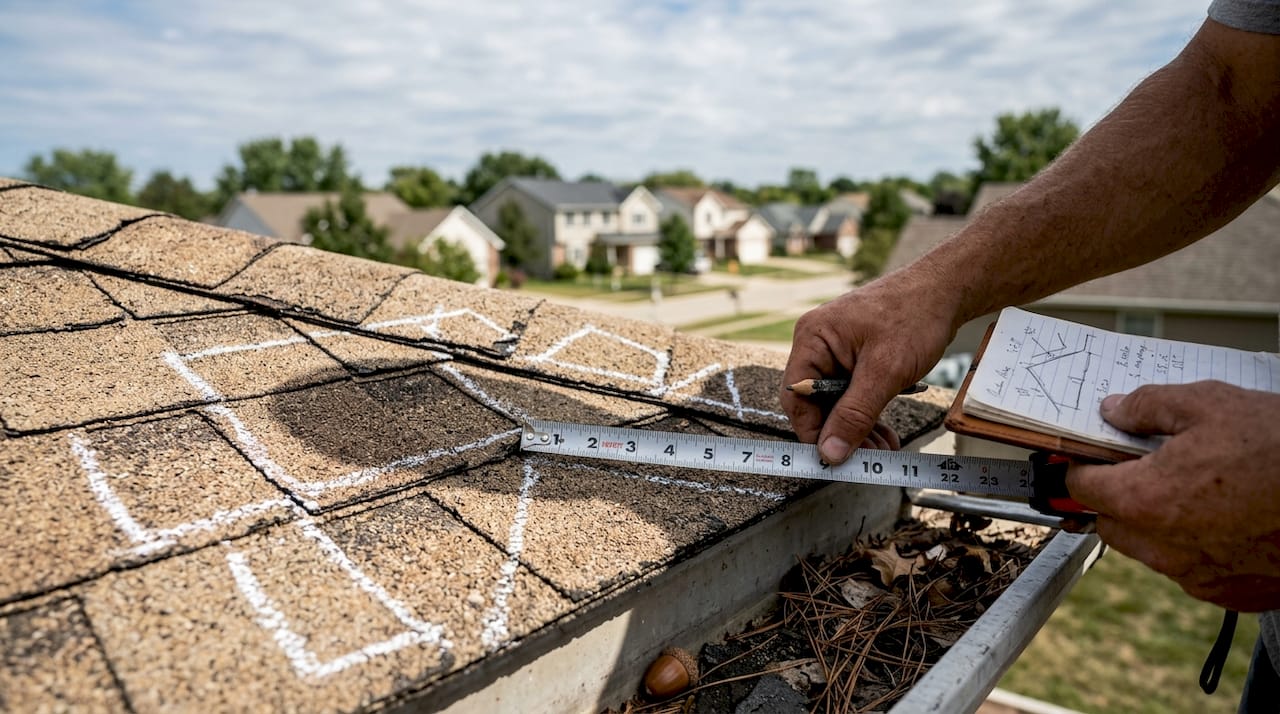
Before you start measuring, make sure you have all the right tools and understand how to stay safe. Rushing this step is where most homeowners lose time and accuracy.
Here is what you need on hand before climbing a single rung:
- Tape measure (at least 25 feet): Measures gutter runs and roof edges accurately.
- Level: Confirms the slope direction so water drains toward downspouts.
- Plumb bob: Helps you find the exact vertical drop from eave to ground.
- Ladder: A sturdy extension ladder rated for your weight plus tools.
- Notepad and pencil: Paper does not crash. Write everything down immediately.
- Smartphone or camera: Photos capture details you might miss on paper.
- Safety glasses and gloves: Protect against debris and sharp metal edges.
As recommended by roofing measurement professionals, a ladder, tape measure, level, plumb bob, and notepad are the core toolkit for accurate gutter sizing. Do not substitute or skip items.
| Tool | Why it matters |
|---|---|
| Tape measure | Captures run lengths and roof widths |
| Level | Ensures correct gutter slope (1/4 inch per 10 feet) |
| Plumb bob | Locates downspout drop points |
| Notepad | Keeps measurements organized by section |
| Camera | Documents current conditions for reference |
For site prep, walk the full perimeter of your home first. Note where trees overhang the roofline, where the ground is uneven, and where existing downspouts are located. Clear debris from the ground below your work area so you have a clean, stable surface to set the ladder. Always follow gutter safety best practices by having a second person steady the ladder whenever possible.
Tell family members or anyone nearby that you are working overhead. This prevents someone from opening a door into your ladder or walking under falling tools. Position the ladder at the correct angle: the base should sit one foot away from the wall for every four feet of ladder height.
Pro Tip: Before you climb, label a fresh notepad page for each side of the house (North, South, East, West). Snap a photo of each section from the ground before measuring. This gives you a visual reference when you sit down to do the math later.
Calculate your roof drainage area accurately
With your tools ready, it is time to tackle the most important measurements: your roof’s drainage area. This number determines everything about your gutter sizing, so accuracy here protects every dollar you spend.
Follow these steps in order:
- Measure the length of each roof edge at eave level. This is the horizontal distance the gutter will cover.
- Measure the width of each roof section from the ridge to the eave edge.
- Multiply length by width to get the base area for that section.
- Identify your roof pitch (rise over run, such as 4/12 or 6/12).
- Apply a pitch multiplier: A 4/12 pitch uses a factor of 1.05; a 6/12 pitch uses 1.08; an 8/12 pitch uses 1.16. Multiply your base area by this factor.
- Add all adjusted sections together to get total drainage area.
For a gable roof, calculate each facade separately and use half the total for each side. Hip roofs require you to measure each triangular and trapezoidal section individually before adding them up.
Here is a real Florida example. Say you have a gable roof with one side measuring 60 feet long and 20 feet wide. Base area is 1,200 square feet. Your pitch is 6/12, so multiply by 1.08. Your adjusted drainage area for that section is 1,296 square feet. That number goes directly into your gutter sizing table.
Warning: Never estimate irregular roof shapes by eye. A bump-out, dormer, or attached garage adds real drainage area. Skipping these sections means your gutters will overflow exactly where you did not account for them.
Complex roofs with multiple valleys and ridges should be broken into simple rectangles and triangles. Measure each shape separately, then add them all together. This is where the custom-fit gutters guide becomes useful for understanding how irregular rooflines affect material needs.
Pro Tip: For homes in hurricane-prone areas of Central Florida, add a 10 to 15 percent buffer to your total calculated drainage area. This safety margin accounts for wind-driven rain that pushes more water into gutters than a vertical rainfall calculation predicts. Check the gutter sizing for Florida homes resource for region-specific guidance.
Determine the ideal gutter size for your home
Once you have measured, the next step is sizing your gutters for Florida’s unique weather. Your drainage area number is only useful when you match it against local rainfall intensity data.
Central Florida uses a 100-year, 5-minute rainfall intensity figure for sizing calculations. In plain terms, this is the heaviest rain rate your area could statistically see in a 5-minute window over a 100-year period. For most of Lake, Marion, and Sumter counties, that rate is roughly 4 inches per hour. Every gutter you install should be sized to handle that flow rate without overflowing.
Central Florida homes sized for 4 in/hr rainfall show that standard 5-inch K-style gutters handle about 740 square feet of drainage area per section. Six-inch gutters handle roughly 40 percent more volume, making them the smarter choice for most Florida homes with larger roof sections.
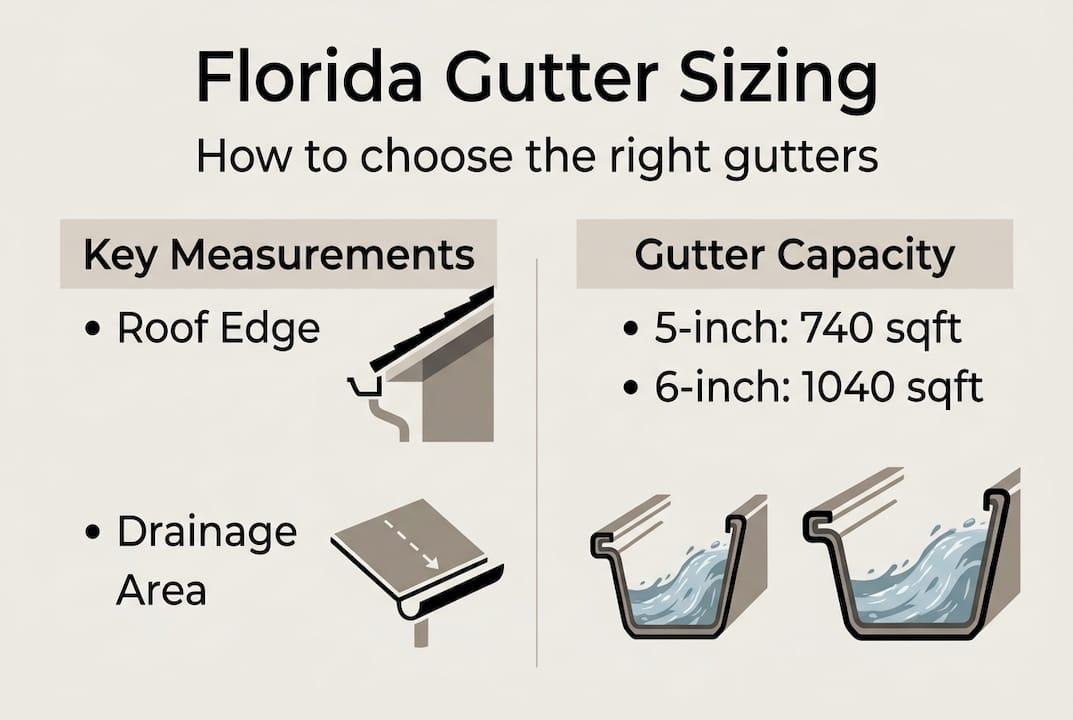
| Gutter size | Max drainage area | Best for |
|---|---|---|
| 4-inch K-style | Up to 480 sq ft | Small additions or sheds |
| 5-inch K-style | Up to 740 sq ft | Smaller home sections |
| 6-inch K-style | Up to 1,040 sq ft | Most Central Florida homes |
| 6-inch half-round | Up to 960 sq ft | Historic or custom homes |
Key considerations when choosing your gutter size:
- 6-inch gutters are the practical standard for most homes in this region given rainfall intensity.
- 5-inch gutters work for smaller sections under 700 square feet but leave little margin for storms.
- Half-round styles offer a classic look but slightly less capacity than K-style at the same width.
- Downspout sizing must match: a 6-inch gutter needs at least a 3×4-inch downspout to drain properly.
The Florida gutter standards reference the Florida Building Code, which in turn points to IPC requirements. While gutters are not always legally required statewide, the gutter sizing guide makes clear they are strongly recommended in Lake, Marion, and Sumter counties to prevent foundation erosion and structural water damage.
Key stat: 6-inch gutters can handle up to 40% more rainwater than 5-inch gutters, making them the better investment for Central Florida’s storm season.
Avoid common mistakes and ensure accurate results
You have got the measurements and selected gutter sizes. Now avoid the mistakes that could undo your hard work before a single bracket goes up.
The most frequent errors homeowners make:
- Skipping pitch adjustment: Measuring only the flat footprint of the roof and ignoring slope underestimates drainage area significantly.
- Missing roof sections: Forgetting a garage overhang or small dormer leaves part of your roof unprotected.
- Measuring only one side: On a gable roof, both sides drain independently and need separate calculations.
- Ignoring downspout capacity: Oversized gutters paired with undersized downspouts create bottlenecks that cause overflow.
- Not accounting for gutter slope: Gutters must slope toward the downspout at 1/4 inch per 10 feet. A level gutter holds standing water and eventually sags.
As steep pitch increases both flow speed and volume, irregular roofs require careful sectioning, and hurricane conditions demand an added safety margin beyond standard calculations.
Florida reality check: Florida storms can dump several inches in minutes. If you are unsure whether your calculation is right, always choose the larger gutter size. The cost difference between 5-inch and 6-inch gutters is small. The cost of water damage is not.
Use this double-check list before finalizing your order:
- Confirm every roof section is accounted for and measured.
- Verify pitch multipliers are applied to each section.
- Cross-reference your total drainage area against the sizing table.
- Check that downspout quantities and sizes match your gutter capacity.
- Review your gutter inspection checklist to catch anything missed.
For ongoing accuracy after installation, follow a gutter maintenance guide for Central Florida to keep gutters clear and functioning at full capacity through every storm season.
Pro Tip: Take clear photos of every measurement point before and after you write it down. If a number looks off later, you can go back to the photo rather than climbing the ladder again.
A Florida pro’s perspective: What most guides miss about gutter measurements
Most online measurement guides treat gutter sizing like a math problem with one right answer. In Florida, it is more like a judgment call backed by math. Code minimums are a floor, not a ceiling. We have seen homes with code-compliant 5-inch gutters overflow during a 20-minute afternoon storm because the calculation did not account for a steep pitch or a wide valley that concentrates runoff.
Small measurement errors get amplified fast. A 10 percent underestimate in drainage area on a 1,200-square-foot roof section means your gutters are already undersized before the first storm hits. Add hurricane-force winds and you have a real problem.
What most guides also skip is downspout placement. You can size the gutter perfectly and still get overflow if the downspout is too far from the low point of the run. Every extra foot of distance adds resistance. Proper placement is as important as proper sizing.
Investing in correctly sized gutters also pays off beyond storm protection. Well-designed gutter systems contribute directly to home value in Central Florida, which is worth remembering when you are deciding between the minimum and the smarter option. When in doubt, go bigger, document everything, and get a second opinion from a local professional before you buy.
Ready for expert measuring or installation help?
If any part of this process feels uncertain, you do not have to figure it out alone. Getting the measurements right the first time saves money, protects your home, and avoids the headache of replacing undersized gutters after a bad storm season.

At Larry’s Gutters, we work with homeowners across Lake, Marion, and Sumter counties every day on exactly these challenges. Whether you need help with complex rooflines, hurricane-rated sizing, or a full installation, our team has the local experience to get it right. Explore our downspout installation steps for a complete picture of the process, follow our install gutters guide for a full DIY walkthrough, or review our gutter replacement steps if you are upgrading an existing system. Contact us today for a free quote.
Frequently asked questions
What measurements do I need to replace my gutters?
Measure the length of each roof edge, calculate the drainage area for each roof section by multiplying length by width and adjusting for slope, then sum your total drainage area to match against a gutter sizing table.
How do I know if my gutters are too small for Florida rain?
If gutters overflow during heavy storms or your roof drainage area exceeds the gutter’s rated capacity, they are too small. 5-inch gutters max out around 740 square feet per section, which is not enough for many Central Florida homes.
Do I need gutters on every side of my house?
Not always, but wherever roof runoff could reach your foundation, gutters are strongly recommended. The FBC references IPC and while gutters are not always required, they are considered essential protection in Central Florida counties.
Should I upsize my gutters for hurricanes?
Yes. Always add a safety margin above code minimums in hurricane-prone areas. Storm intensity can overwhelm smaller gutters in minutes, so choosing the next size up is a low-cost way to protect your home.
What’s the biggest mistake people make when measuring for new gutters?
The most common mistake is skipping the pitch adjustment or missing irregular roof sections entirely. Irregular roofs require careful sectioning to avoid undersizing, which leads to overflow and water damage at exactly the wrong moment.
