
TL;DR:
- A gutter miter is a corner fitting that joins two gutter sections at an angle to direct water around building corners. Proper installation and sealing prevent leaks, debris buildup, and potential water damage to foundations. Regular maintenance and correct profile matching are essential for a durable and efficient gutter system.
A gutter mitre is a specialized corner fitting that joins two gutter sections at an angle, typically 90 or 45 degrees, to route water continuously around the corners of your home. Without it, water would spill freely at every roofline turn instead of flowing toward a downspout. Residential rooflines most commonly use 90-degree miters, while non-standard architecture may require 45-degree, 135-degree, or adjustable fittings. The industry term is “gutter miter” (American English spelling), and you will see both “mitre” and “miter” used interchangeably depending on the source. Understanding what a gutter mitre does, and how to install and maintain one correctly, is the difference between a dry foundation and a costly water damage repair.
What is a gutter mitre and how does it work?
A gutter miter is the angled connector that makes two straight gutter runs meet cleanly at a corner. Think of it as the elbow joint of your gutter system. Without it, water would hit a dead end at every corner of your roofline and overflow onto your siding, landscaping, and foundation.

The fitting works by creating a watertight channel that redirects water flow from one gutter run into the next. Using correct miters prevents unnecessary downspouts by effectively routing water through corners. That means fewer penetrations through your fascia board and a cleaner, more efficient drainage system overall.
Two primary categories exist: inside miters and outside miters. An inside miter handles inward-facing corners, where two walls of your home meet and push the roofline inward. An outside miter handles outward-facing corners, where the roofline projects away from the building. Getting this distinction wrong means buying the wrong part entirely, so measure your corner direction before ordering.
What are the different types of gutter mitres?
Three main styles of gutter miters exist: strip miters, box miters, and hand-cut miters. Each has a different construction method, skill requirement, and performance profile.
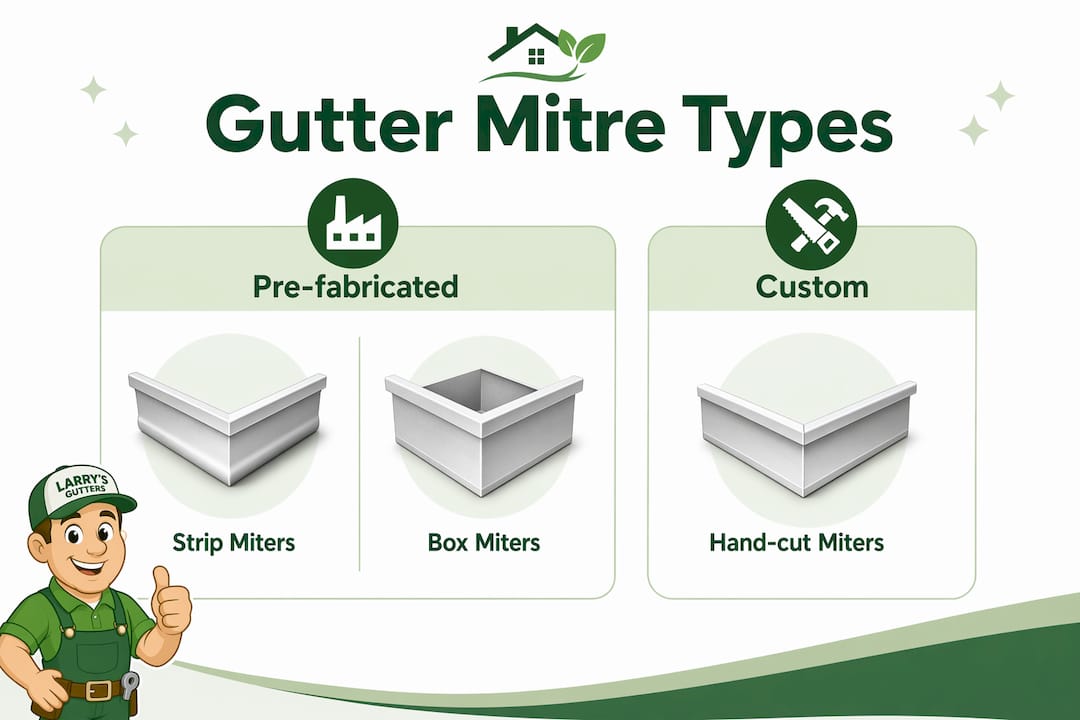
Strip miters
A strip miter is a flat, pre-formed metal piece that wraps around the outside of a corner joint. It is the simplest option and works well for basic repairs. Strip miters are not structural on their own and rely heavily on sealant for waterproofing.
Box miters
A box miter is a pre-fabricated corner unit that snaps or slides onto the ends of two gutter sections. It is the most common choice for DIY homeowners because it requires no cutting. Box miters are easier for many DIYers but may trap more debris compared to hand-cut miters, which require greater skill and tools like a miter box. In heavy-debris environments, that debris accumulation can restrict water flow and accelerate sealant wear.
Hand-cut miters
A hand-cut miter is fabricated on-site by cutting two gutter sections at matching angles and joining them directly. Hand-cut miters offer cleaner flow but need specialized installation skills. The result is a tighter, lower-profile joint that sheds debris more easily. Professional installers prefer this method for custom or high-end gutter systems.
| Miter type | Skill level | Debris risk | Best use |
|---|---|---|---|
| Strip miter | Beginner | High | Simple repairs, temporary fixes |
| Box miter | Intermediate | Moderate | Standard DIY installation |
| Hand-cut miter | Advanced | Low | Custom installs, professional work |
Pro Tip: Match your miter to your gutter profile type. A K-style miter will not fit a half-round gutter, and forcing the wrong profile creates gaps that leak from day one.
Gutter miters must match gutter profile tolerance to avoid structural risks to the building over time. Proper profile matching protects both the gutter system and your foundation.
Why does proper gutter mitre installation and sealing matter?
Leaking miters are one of the most common gutter failures homeowners face. Leaking miters often result from improper sealing, caulk deterioration, or debris buildup causing water backup. Debris can reduce sealant lifespan by up to 50% compared to clean gutters. That is a significant reduction, and it means a miter that looks fine from the ground can be failing silently at the joint.
Sealant choice matters as much as technique. High-grade sealants like Geocel 2320 perform better on gutter miters by accommodating metal expansion and contraction versus generic silicone. Generic silicone cracks as the gutter flexes through temperature cycles, creating gaps that let water through. Geocel 2320 and similar gutter-specific sealants flex with the metal and maintain their bond far longer.
Surface preparation is non-negotiable before sealing. Applying sealant to a wet or damp miter joint causes bond failure and recurring leaks. The joint must be bone dry, clean, and free of old caulk before you apply anything new. Skipping this step is the single most common reason a repair fails within one season.
Thermal expansion adds another layer of complexity. Thermal expansion causes metal gutters to expand and contract, which can separate poorly secured miter joints if not fastened properly. Correct fastener placement at the joint keeps the miter from pulling apart as temperatures swing. Florida homeowners face this challenge year-round because of the state’s intense heat cycles.
Key installation best practices:
- Clean the joint thoroughly and remove all old sealant before starting.
- Let the joint dry completely, at least several hours in dry weather.
- Apply a gutter-specific sealant like Geocel 2320 in a continuous bead along the interior seam.
- Fasten the miter with the correct number of screws to resist thermal movement.
- Check alignment before the sealant cures to avoid a crooked joint.
For a deeper look at sealing techniques, the role of gutter caulking guide covers product selection and application steps in detail.
How to maintain and troubleshoot gutter mitres
Maintenance is what separates a gutter system that lasts 20 years from one that fails in five. Miter corners collect more debris than straight gutter runs because water slows at the turn. That debris presses against the sealant, holds moisture, and accelerates deterioration.
Follow this inspection and maintenance routine at least twice a year, ideally in spring and fall:
- Inspect visually from the ground. Look for staining on the fascia board below each corner. Water streaks below a miter joint signal a leak.
- Clear debris from the corner. Use a garden trowel or gloved hand to remove leaves, dirt, and sediment from inside the miter.
- Check the sealant bead. Run your finger along the interior seam. Cracked, peeling, or missing sealant needs immediate replacement.
- Test with a garden hose. Run water through the gutter and watch the miter joint for drips or spray.
- Re-caulk if needed. Dry the joint, apply fresh gutter sealant, and allow full cure time before the next rain.
Pro Tip: After cleaning your gutters, always run water through the system and watch every miter joint for two full minutes. Slow drips only appear under sustained flow, not a quick splash.
Poorly formed 90-degree miters create bottlenecks that trap sediment and restrict flow. If your miter corner consistently clogs, consider upgrading to a box miter with a wider interior radius, or consult a professional about a hand-cut replacement. Your gutter maintenance checklist for Florida conditions covers the full seasonal routine in detail.
Neglected miters lead to foundation water damage over time. Water that overflows at a corner lands at the base of your home and saturates the soil around your foundation. Fixing a miter costs far less than repairing a cracked foundation.
What tools and materials do you need for gutter mitre installation?
DIY gutter miter installation is achievable for most homeowners, but the right tools make the difference between a clean job and a leaky one.
Essential tools and materials:
- Miter box or tin snips for hand-cut miters; not needed for box miters
- Cordless drill with sheet metal screws sized for your gutter gauge
- Gutter-specific sealant such as Geocel 2320 or equivalent
- Wire brush and rags for joint cleaning and surface prep
- Caulk gun for controlled sealant application
- Safety glasses and work gloves for handling cut metal edges
- Ladder stabilizer to keep your ladder off the gutter and protect the joint
Choosing the right miter starts with knowing your gutter profile. K-style gutters are the most common residential profile in the United States, and K-style miters are widely available at home improvement stores. Half-round gutters require their own miter style. Mixing profiles creates gaps that no amount of sealant will fix permanently.
Box miters suit most DIY homeowners because they require no cutting. Hand-cut miters produce better results but demand experience with tin snips or a miter saw, accurate angle measurement, and confident sealing technique. If you have not installed gutters before, start with a box miter.
Safety is straightforward but worth stating clearly. Work from a stable ladder on level ground. Never lean the ladder against the gutter itself. Have a second person hold the ladder when working above one story. If the corner is above a steep roofline or hard to reach safely, professional installation is the right call. The seamless gutter installation process guide walks through the full installation sequence, including corner work, for homeowners who want the complete picture.
Key Takeaways
A gutter miter is the single most failure-prone joint in any gutter system, and correct sealant, fastening, and debris management are what keep it watertight for years.
| Point | Details |
|---|---|
| Miter types vary by skill level | Box miters suit DIYers; hand-cut miters offer cleaner flow but require advanced skills. |
| Profile matching is non-negotiable | K-style and half-round gutters each require their own miter; mixing profiles causes leaks. |
| Sealant quality determines durability | Use gutter-specific sealants like Geocel 2320 to handle metal expansion and contraction. |
| Dry joints seal correctly | Apply sealant only to a bone-dry, clean surface to prevent bond failure and repeat leaks. |
| Regular inspection prevents major damage | Clear debris from corners twice a year and test with a hose to catch leaks before they worsen. |
What I have learned from watching homeowners tackle gutter miters
Most homeowners underestimate the miter. They buy the right gutter, hang it correctly, and then grab a tube of whatever silicone is on the shelf to seal the corner. That is where the system fails. Generic silicone does not flex with aluminum or steel gutters through Florida’s heat cycles. Within a year, the bead cracks, water gets in, and the homeowner assumes the gutter itself is defective.
The second mistake I see constantly is sealing over old caulk. Homeowners spot a drip, squeeze new sealant on top of the old, and call it done. New sealant bonded to failed old sealant peels off within months. The only real fix is removing every trace of the old material, drying the joint completely, and starting fresh.
Hand-cut miters intimidate people, and I understand why. But for anyone comfortable with a miter saw and willing to take their time, the result is genuinely better than a box miter. The joint sits flatter, sheds debris more easily, and looks cleaner. If you are already doing a full gutter installation, the extra effort is worth it.
My honest advice: treat the miter like the most important joint in your gutter system, because it is. Spend the extra few dollars on a quality sealant. Take the time to prep the surface properly. Check every corner with a hose before you call the job done. Those three habits will keep your corners dry for a decade or more.
— Larrysgutters
Larrysgutters resources for gutter mitre installation
Gutter miter installation is one of those jobs where the right information upfront saves hours of rework later. Larrysgutters has put together practical guides built specifically for Central Florida homeowners dealing with heavy rainfall and year-round heat cycles.

The gutter downspout installation steps guide is a strong starting point if you are planning a full gutter run, since downspout placement connects directly to how your miters route water. For homeowners dealing with an existing leak at a corner joint, the fix gutter leaks guide covers diagnosis and repair step by step. If you would rather have a professional handle the corners and sealing, Larrysgutters serves homeowners across Central Florida with expert installation and repair services.
FAQ
What is a gutter mitre used for?
A gutter miter is a corner fitting that joins two gutter sections at an angle, typically 90 degrees, to route water continuously around the corners of a building without leaking.
What is the difference between an inside and outside gutter miter?
An inside miter connects gutters at an inward-facing corner where two walls meet. An outside miter connects gutters at an outward-facing corner where the roofline projects away from the building.
How do I stop a gutter miter from leaking?
Remove all old sealant, let the joint dry completely, and apply a gutter-specific sealant like Geocel 2320 in a continuous bead along the interior seam. Sealing a damp joint causes bond failure and repeat leaks.
Do gutter miters need to match the gutter profile?
Yes. K-style miters and half-round miters are not interchangeable. Using the wrong profile creates gaps that sealant alone cannot fix permanently.
How often should I inspect gutter miter joints?
Inspect miter joints at least twice a year, in spring and fall, and after any major storm. Clear debris from corners and test with a garden hose to catch slow leaks before they cause foundation damage.
