
TL;DR:
- Gutter end caps seal gutter ends to prevent water leaks, debris entry, and animal intrusion, protecting your home from damage. Proper matching of material, profile, orientation, and flexible sealant is essential for a reliable, long-lasting seal. Regular inspections and correct installation practices can save homeowners from costly repairs caused by leaks and system failure.
Gutter end caps are defined as the closures that seal the open terminals of every gutter run, and without them, your entire drainage system fails at its endpoints. The role of gutter end caps extends well beyond plugging a hole. They prevent water from spilling behind fascia boards, block debris and small animals from entering the channel, and protect your foundation, soffits, and exterior trim from chronic moisture exposure. Available in aluminum (gauges from 0.019 to 0.032 inch), vinyl, galvanized steel, and copper, end caps are manufactured to match specific gutter profiles. Proper installation is what separates a cap that lasts a decade from one that leaks after the first heavy rain.
What materials and styles are right for your gutter end caps?
Choosing the correct end cap starts with matching two things: the material and the profile. Gutter end caps are manufactured in aluminum, vinyl, galvanized steel, and copper, each corresponding to the gutter material already on your home. Aluminum caps are the most common choice for residential systems because they resist corrosion, hold paint well, and come in multiple gauges to match the gutter wall thickness. Copper caps are reserved for premium installations where aesthetics matter as much as function.
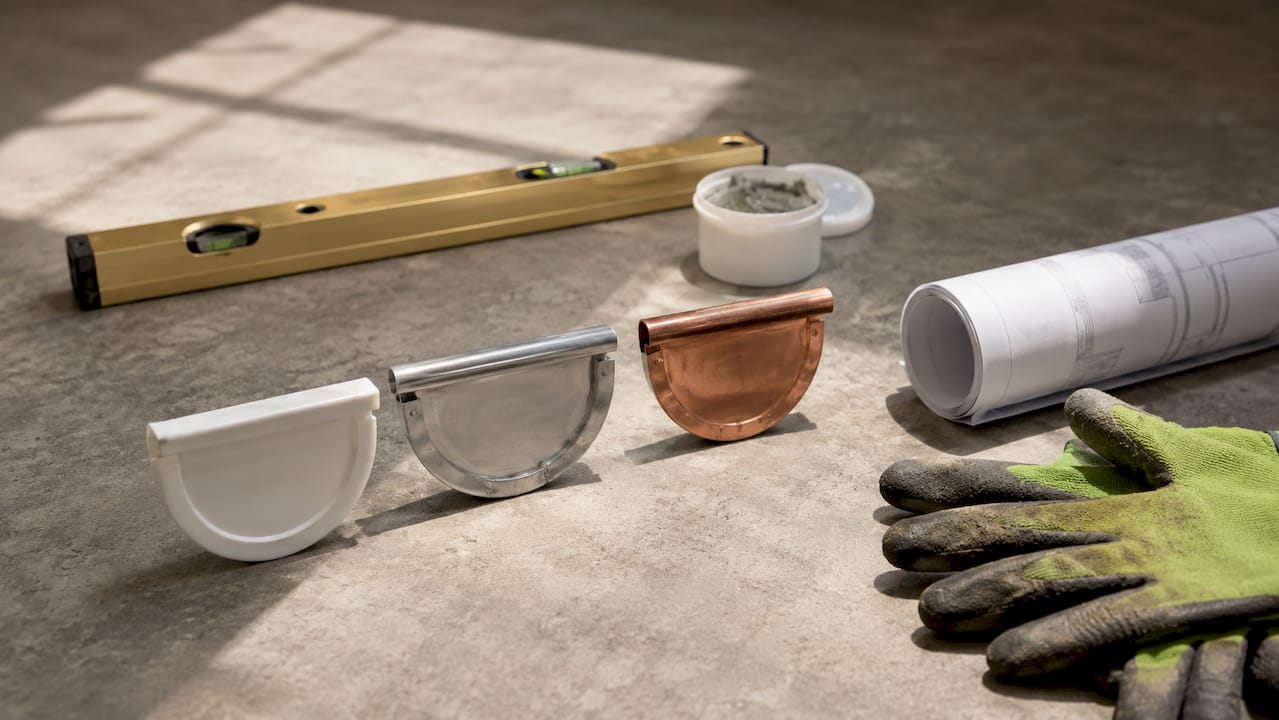
Profile matching is non-negotiable. A K-style cap will not fit a half-round gutter, and a half-round cap will not seal a box gutter. Forcing a mismatched cap creates gaps that leak immediately. The three dominant residential profiles are K-style (the most common in Central Florida), half-round (popular on older or historic homes), and box gutters (typically found on commercial or custom residential builds).
Orientation is the detail most DIYers overlook. Left and right orientations mirror the gutter profile, and installing the wrong side is one of the most common causes of post-installation leaks and return trips to the hardware store. Stand at the end of the gutter run and look toward the downspout. If the open end is on your left, you need a left-hand cap.
The table below compares the four main attachment methods:
| Attachment method | Best use case | Sealant required? |
|---|---|---|
| Snap-on | Vinyl gutters, DIY installs | Yes, recommended |
| Screw-on | Aluminum K-style, light-duty | Yes, required |
| Riveted | Aluminum, professional installs | Yes, applied before riveting |
| Soldered | Copper systems only | No (solder is the seal) |
Pro Tip: Never buy a generic or “universal” end cap. Universal caps are designed to fit everything loosely, which means they seal nothing reliably. Always purchase a cap labeled for your exact gutter profile, gauge, and orientation.
How do gutter end caps protect your home from water damage?
A failed end cap seal is one of the most common causes of localized wood rot and exterior trim damage on residential homes. When water escapes at the gutter terminal instead of flowing to the downspout, it runs directly behind the fascia board. Over months, that moisture rots the wood, invites mold and mildew, and eventually compromises the structural connection between the roof deck and the wall.
The damage does not stop at the roofline. Water that spills at gutter ends falls close to the foundation, where it saturates soil and creates hydrostatic pressure against basement walls or slab edges. The foundation damage risk from chronic gutter leaks is well documented, and end cap failure is a direct contributor to that risk.
Beyond water, open or failed end caps create entry points for:
- Leaves, pine needles, and seed pods that pack tightly and cause overflow
- Wasps, hornets, and mud daubers that build nests inside the channel
- Mice and small birds that use the enclosed space for shelter
- Standing water that breeds mosquitoes, a serious concern in Florida
Properly sealed end caps also contribute to consistent water flow that reduces ice dam formation risk in colder climates. In Florida, the equivalent concern is overflow during intense rain events. When end caps hold, the gutter channels its full volume to the downspout instead of dumping water at the corners of your home.
“Professional installers view end caps as critical working joints within the gutter system that must accommodate both hydrostatic loads during heavy rain and thermal expansion across seasons.” — Jaspector Gutter Repair Guide
The structural case for maintaining end caps is straightforward. A $12 aluminum cap and 20 minutes of labor prevents repairs that routinely cost hundreds to thousands of dollars in fascia replacement, mold remediation, or foundation waterproofing.
What are the best practices for installing gutter end caps?
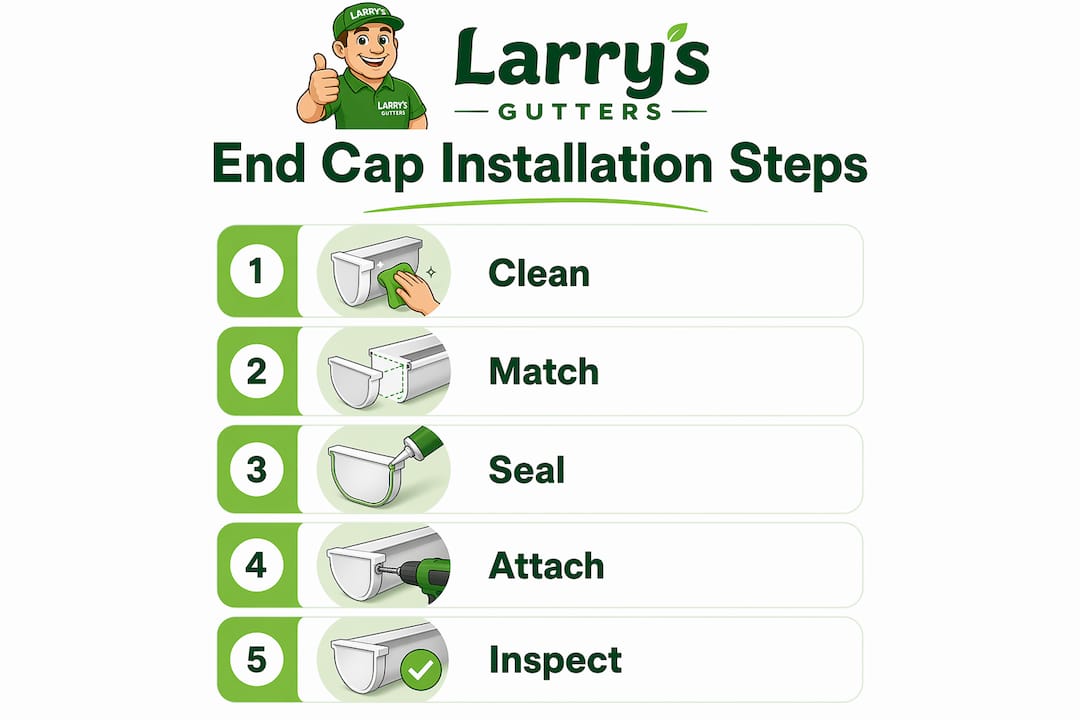
Installation quality determines whether an end cap lasts two years or twenty. Follow these steps for a leak-free result:
- Clean the gutter end thoroughly. Remove all dirt, oxidation, and old sealant from the inside of the gutter terminal. A wire brush and acetone or denatured alcohol work well. Any contamination prevents the new sealant from bonding.
- Select the right sealant. Polyurethane or rubberized butyl sealant is the professional standard. Both remain flexible after curing, which matters because aluminum gutters shift several millimeters seasonally due to thermal expansion. Silicone caulk from the hardware store is too rigid and will crack at the joint within one or two seasons.
- Apply sealant before attaching the cap. Run a bead of sealant around the inside perimeter of the cap or along the gutter end flange. Press the cap firmly into position so the sealant spreads evenly across the contact surface.
- Fasten mechanically. Use pop rivets or sheet metal screws to lock the cap in place. Mechanical fasteners alone do not guarantee water-tightness. The sealant carries the waterproofing load; the fasteners prevent the cap from shifting under wind or debris pressure.
- Smooth the sealant bead. Use a gloved finger or a caulk tool to press any squeezed-out sealant into the seam. This eliminates air pockets and creates a clean, continuous bond line.
- Allow full cure time before rain exposure. Most polyurethane sealants reach full cure in 24 to 48 hours. If rain is forecast, cover the area or delay installation.
For ongoing maintenance, inspect end caps twice a year and after major storms. Look for sealant that has pulled away from the cap edge, rust streaks below the gutter end, or water dripping at the terminal during rain. A quick resealing job at the first sign of separation costs almost nothing compared to the damage a leaking end cap causes over a single wet season.
Pro Tip: During your inspection, press gently on each end cap. A properly installed cap should feel solid with zero flex. Any movement means the fasteners or sealant have failed and the cap needs to be reseated and resealed before the next rain event.
You can find a broader maintenance checklist in this guide on seamless gutter upkeep that covers everything from cleaning schedules to downspout flushing.
Common mistakes homeowners make with gutter end caps
Most end cap failures trace back to a short list of avoidable errors. Knowing them in advance saves you from repeating the same repair twice.
- Buying the wrong size or profile. A cap that does not match the gutter profile creates gaps no amount of sealant can reliably fill. Always bring a sample of your existing gutter material or its specifications to the hardware store.
- Ignoring thermal expansion. Aluminum gutters shift seasonally, and a sealant that cannot flex with that movement will crack and separate. Using rigid general-purpose caulk instead of flexible polyurethane or butyl is the single most common cause of premature sealant failure.
- Relying on fasteners without sealant. Screws and rivets hold the cap in position. They do not create a waterproof seal. Skipping sealant because the cap feels tight is a mistake that shows up as a leak within months.
- Skipping routine inspections. Visible signs of end cap failure include rust streaks below the gutter terminal, sealant pulling away from the seam, and water dripping at the end of the gutter during rain. These are easy to spot during a twice-yearly walkthrough but easy to miss if you never look.
- Using the wrong orientation. Installing a right-hand cap on a left-hand gutter end creates a gap on one side that no sealant can bridge correctly. Double-check orientation before you apply any sealant or drive any fasteners.
Understanding K-style gutter profiles before you shop makes avoiding most of these mistakes much simpler.
Key takeaways
Gutter end caps are the most underestimated component in a residential drainage system, and getting them right requires matching material, profile, orientation, and sealant in that order.
| Point | Details |
|---|---|
| End cap function | Seals open gutter terminals to prevent leaks, debris entry, and animal intrusion. |
| Material and profile matching | Always match the cap material and profile (K-style, half-round, box) to the existing gutter. |
| Orientation matters | Left and right caps are not interchangeable; wrong orientation causes immediate leaks. |
| Sealant is the primary seal | Flexible polyurethane or butyl sealant does the waterproofing work; fasteners only hold position. |
| Inspect twice yearly | Check for sealant separation, rust streaks, and cap movement after every storm season. |
Why end caps deserve more attention than they get
Here is what years of watching gutter systems fail has made clear: end caps are treated as afterthoughts during installation and ignored entirely during maintenance. Homeowners spend real money on seamless aluminum gutters and quality gutter guards, then lose the entire investment to a $12 cap that was installed dry with no sealant.
The thermal expansion issue is the one that surprises people most. Florida does not get the freeze-thaw cycles of the Midwest, but the temperature swing between a January morning and an August afternoon is still significant enough to stress a rigid sealant joint over time. I have seen end caps that looked perfect from the ground leaking steadily behind the fascia because the sealant had micro-cracked along the bond line. The damage was invisible until the fascia board was soft enough to push a finger through.
The other thing worth saying plainly: the orientation mistake is embarrassingly common, even among experienced DIYers. Hardware stores stock both orientations on the same peg, and the labeling is small. Buying the wrong one, installing it, and then wondering why the corner leaks is a rite of passage for a lot of homeowners. The fix is simple: stand at the open end of the gutter, face the run, and note which side is open. That is the hand you need.
End caps are not glamorous. They are not the part of a gutter installation anyone photographs or brags about. But they are the joint that holds the whole system together at its most vulnerable point, and treating them with the same care as any other working joint pays off every time it rains.
— Larrysgutters
Get professional gutter installation from Larrysgutters

Larrysgutters installs custom-fit seamless gutters across Central Florida, and every installation includes properly matched, correctly oriented end caps sealed with professional-grade sealant. If your current end caps are leaking, pulling away, or were installed without sealant, the repair is straightforward but the timing matters. Florida’s rainy season does not wait. Larrysgutters offers free quotes on seamless gutter installation and can assess your existing system for end cap failures before they turn into fascia or foundation repairs. Contact Larrysgutters directly to schedule a consultation and get your gutter system sealed correctly from end to end.
FAQ
What is the purpose of a gutter end cap?
A gutter end cap seals the open terminal of a gutter run to prevent water leaks, debris entry, and animal intrusion. Without a properly sealed cap, water escapes at the gutter end and causes fascia rot, foundation damage, and mold growth.
How do I know if my gutter end cap is failing?
Common signs of failure include water dripping at the gutter end during rain, rust streaks on the fascia below the terminal, and visible sealant pulling away from the cap edge. Inspecting during or immediately after a rainstorm gives the clearest view of active leaks.
Can I install a gutter end cap myself?
Yes. Clean the gutter end, apply flexible polyurethane or rubberized butyl sealant, press the correctly matched cap into position, and secure it with pop rivets or sheet metal screws. The full process takes under 30 minutes with the right materials.
What sealant should I use for gutter end caps?
Polyurethane or rubberized butyl sealant is the professional standard because both remain flexible after curing. General-purpose silicone caulk is too rigid and cracks at the joint as the gutter expands and contracts seasonally.
Does the orientation of a gutter end cap matter?
Yes. Left and right end caps mirror the gutter profile and are not interchangeable. Installing the wrong orientation creates a gap that causes immediate leaks regardless of how much sealant is applied.