
TL;DR:
- A downspout diverter redirects rainwater into a rain barrel, protecting your home and conserving water. Proper installation involves correct height, sealing all joints, and ensuring an overflow pathway at least 6 to 10 feet from the foundation. Regular maintenance, including cleaning and winterizing, extends the system’s lifespan and keeps it functioning effectively.
A downspout diverter is a fitting that intercepts rainwater flowing through your downspout and redirects it into a rain barrel or away from your foundation. A proper downspout diverter setup solves two problems at once: it captures usable rainwater for your garden and protects your home from water damage caused by runoff pooling near the foundation. The industry term for this process is “rainwater diversion,” and it sits at the heart of any effective downspout drainage solution. A diverter intercepts rainwater while letting excess bypass the barrel automatically, so overflow never backs up against your siding.
What tools and materials do you need for a downspout diverter setup?
Preparation separates a clean install from a leaky mess. Before you touch the downspout, gather every tool and material you need.
Tools required:
- Drill with a hole saw bit sized to your diverter kit
- Hacksaw or tin snips for cutting the downspout
- Level to confirm your barrel sits flat
- Tape measure and marker for accurate cuts
- Safety gloves and goggles
Materials to have on hand:
- Downspout diverter kit (typically includes the diverter body, hose, and basic fittings)
- Self-tapping screws (many kits skip these, so buy extras)
- Exterior-grade silicone caulk for sealing all joints
- A rain barrel with an inlet port and overflow outlet
Standard diverter kits cost between $15 and $40, and a typical install takes about 30 minutes. That cost-to-benefit ratio is hard to beat for a home improvement project.
Site selection matters as much as the tools. Place your rain barrel on a firm, level surface directly beside the downspout. A full 50-gallon rain barrel weighs over 400 pounds, so a soft or uneven base will shift over time and stress the hose connection. Keep the barrel away from trees. Debris from nearby trees clogs diverters faster than almost anything else and forces more frequent cleaning.

Pro Tip: Kits often lack sufficient hardware. Buy a tube of exterior-grade silicone caulk and a pack of self-tapping screws before you start. You will need both.
| Preparation step | Why it matters |
|---|---|
| Choose a firm, level base | Prevents barrel shift and hose stress over time |
| Measure barrel inlet height | Determines correct diverter placement on downspout |
| Clear debris from gutters | Reduces clogging at the diverter screen |
| Confirm overflow path | Directs excess water away from the foundation |
How do you install a downspout diverter step by step?
The installation process follows a logical sequence. Skipping a step or reversing the order causes leaks and backflow.
Step 1: Measure and mark the cut line.
Hold the diverter body against the downspout at the height where the outlet aligns with or sits slightly above the barrel inlet. Mark the cut line with a marker. The diverter outlet must sit at or slightly above the barrel inlet for gravity to pull water into the barrel. Lower placement causes backup and overflow onto your siding.
Step 2: Cut the downspout.
Use a hacksaw or tin snips to cut along your marked line. Cut slowly and wear gloves. Sheet metal edges are sharp. Remove any burrs with a file so the diverter body seats flush against the downspout.
Step 3: Mount the diverter.
Slide the diverter body into the cut section of the downspout. Most kits use a friction fit, but secure it with self-tapping screws through the pre-drilled holes. Do not rely on friction alone. Florida’s heavy rain events create significant water pressure that will push a loose fitting out of position.
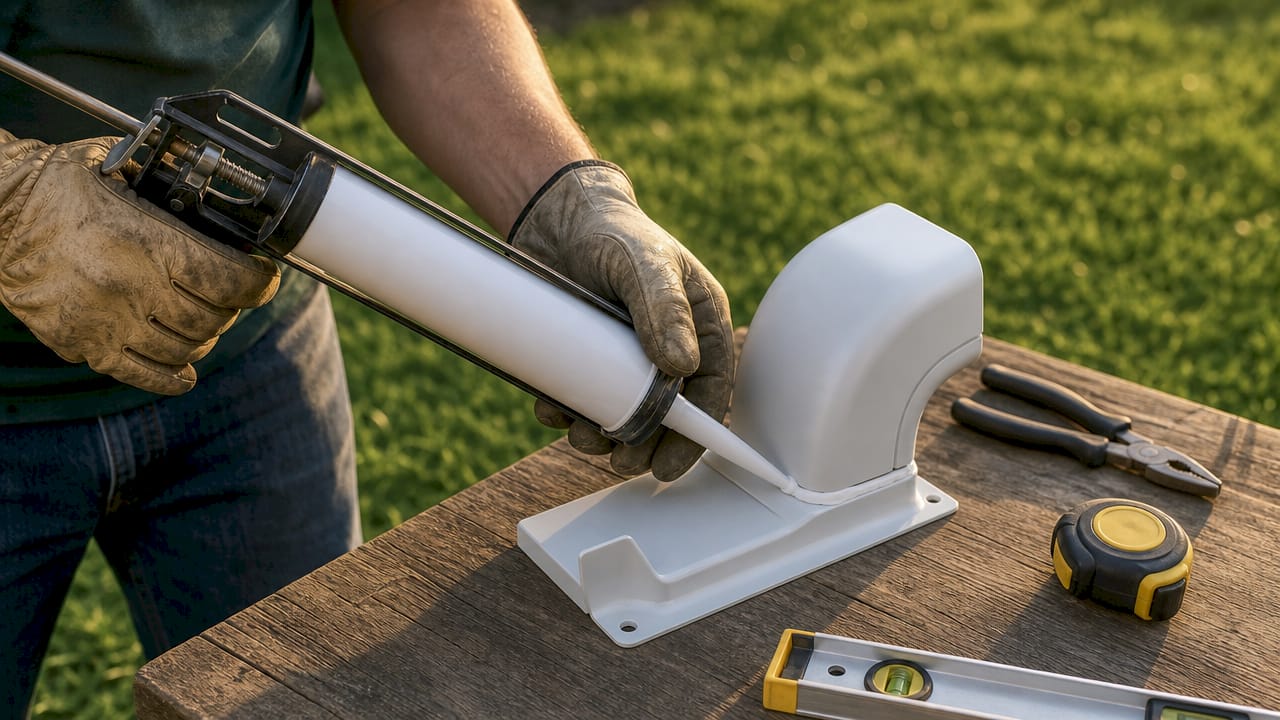
Step 4: Seal all joints.
Apply exterior-grade silicone caulk around every joint where the diverter meets the downspout. This step prevents drips that stain siding and cause long-term moisture damage. Let the caulk cure fully before running a flow test.
Step 5: Connect the hose to the barrel.
Attach the diverter’s outlet hose to the barrel’s inlet port. Keep the hose as short and direct as possible. A long, sagging hose traps debris and slows flow. Confirm the hose runs slightly downhill from the diverter outlet to the barrel inlet.
Step 6: Check the overflow path.
Every rain barrel fills up. Overflow must redirect safely beyond the foundation, often using a hose or pipe extension. Connect an overflow hose to the barrel’s overflow port and route it at least 6 to 10 feet from the house. The 10-foot drainage rule protects foundations from water that saturates soil near footings.
Pro Tip: Run a garden hose into your gutter to simulate rain before the next storm. Watch every joint for drips and confirm water flows into the barrel, not back up the downspout.
Step 7: Secure and test.
Tighten all screws, confirm the barrel sits level, and run your flow test. Check that the diverter automatically bypasses water into the downspout once the barrel fills. Diverters maintain the original drainage path intact and route excess water back through the downspout when the barrel is full. That automatic bypass is the feature that separates a diverter from a simple splitter.
For a broader look at how downspouts connect to your full gutter system, the gutter downspout installation steps guide covers the complete picture.
What mistakes do homeowners make during diverter installation?
Most installation failures trace back to a handful of predictable errors. Knowing them in advance saves you from redoing the work.
Placing the diverter too low. Positioning the diverter too low relative to the barrel inlet causes water to back up and overflow onto your siding. Always measure the barrel inlet height before marking your cut line.
Skipping the sealant. A friction-fit diverter without caulk will drip at every joint. Those drips stain siding, rot wood trim, and eventually cause mold. Exterior-grade silicone caulk is the fix, and it costs less than $10.
Ignoring the overflow path. A full barrel with no overflow route sends water straight back toward your foundation. That defeats the entire purpose of the setup. Route overflow at least 6 feet from the house, and 10 feet is better.
Placing the barrel near trees. Leaf debris and seed pods clog the diverter screen quickly. A clogged screen blocks flow and forces water to back up into the gutter. Keep the barrel in a clear area and clean the screen after every major storm.
Skipping winterization. In climates with freezing temperatures, water left in the barrel and fittings expands as ice and cracks plastic components. Even in Central Florida, an unexpected cold snap can damage fittings left full of water.
A diverter supplements rainwater harvesting but is not a complete foundation drainage solution. Combine it with proper underground extensions or French drains for full protection against foundation water intrusion.
Pro Tip: After every heavy rain in the first month, inspect every joint and screw. New installations settle, and small leaks appear that were not visible during the initial flow test.
How do you maintain and winterize your diverter system?
A diverter system that gets no attention after installation will fail within a season or two. Regular upkeep takes less than an hour per month and extends the system’s life significantly.
- Clean gutters and the diverter screen monthly. Debris that reaches the diverter screen reduces flow and causes backups. Pull the screen out, rinse it, and replace it. Clean gutters mean less debris reaches the diverter in the first place. Larrysgutters covers this process in detail in the clean downspouts guide for Florida homeowners.
- Inspect seals after every major storm. Silicone caulk holds up well, but heavy rain and UV exposure degrade it over time. Look for drips at every joint and reapply caulk where needed.
- Monitor the overflow path. Confirm the overflow hose stays connected and routes water away from the foundation. Hoses shift and disconnect during storms.
- Drain and prepare before freezing weather. Winterization requires fully draining barrels and removing spigots and overflow fittings, or keeping lids off to prevent freeze damage from ice expansion. Store rubber fittings and the overflow hose indoors during cold months.
- Reactivate in spring. Reconnect fittings, reinstall the diverter hose, and run a flow test before the rainy season starts. Replace any cracked or brittle components you find during the inspection.
Pro Tip: Set a phone reminder for the first week of november to drain your barrel and disconnect fittings. One freeze event can crack a $40 barrel and split every rubber fitting in the system.
What I’ve learned from watching homeowners set up diverters
The single most common mistake I see is treating the diverter as the last step instead of the first decision. Homeowners buy a barrel, find a spot that looks convenient, and then discover the downspout is 4 feet away or the ground slopes toward the house. The barrel location should drive every other decision, not the other way around.
Sealant choice matters more than most guides admit. Generic caulk from a bargain bin fails within one season in Florida’s heat and UV exposure. Exterior-grade silicone is the only product worth using on outdoor joints that see direct sun and rain.
A diverter alone does not solve a drainage problem. It captures water efficiently and reduces runoff, but if your yard already floods, you need integrated gutter drainage that includes underground extensions or grading corrections. A diverter is one piece of a larger system, and homeowners who treat it as a complete fix end up disappointed after the first heavy storm.
The payoff is real when the setup is done right. A properly installed diverter reduces the volume of water hitting your foundation during every rain event, extends the life of your landscaping, and gives you a free water source for dry weeks. That combination of benefits makes it one of the highest-return DIY projects a homeowner can tackle.
— Results
Larrysgutters can help with your full gutter system
A diverter works best when the gutters feeding it are in good shape. Clogged, leaking, or undersized gutters send debris and overflow that overwhelm even a well-installed diverter.

Larrysgutters specializes in seamless gutter installation and repair across Central Florida, including gutter guard systems that reduce the debris reaching your diverter in the first place. If your gutters are aging or undersized for Florida’s rainfall, a new seamless system gives your diverter setup the foundation it needs to perform. Contact Larry’s Gutters for a free quote and find out what a properly sized, professionally installed gutter system can do for your home’s drainage.
FAQ
What is a downspout diverter?
A downspout diverter is a fitting installed in your downspout that redirects rainwater into a rain barrel while automatically routing overflow back through the downspout once the barrel is full.
How high should I mount the diverter on the downspout?
Mount the diverter so its outlet sits at or slightly above the barrel inlet. Lower placement causes backflow and overflow onto your siding.
Do I need special tools for installing a downspout diverter?
A drill, hacksaw, level, and tape measure cover most installs. Add exterior-grade silicone caulk and self-tapping screws, since most kits do not include enough hardware.
How far should overflow water discharge from the house?
Overflow should discharge at least 6 to 10 feet from the foundation. The 10-foot drainage rule protects footings from soil saturation that leads to foundation damage.
How often should I clean my diverter?
Clean the diverter screen monthly and after every major storm. Debris buildup blocks flow and forces water back into the gutter, reducing the system’s effectiveness.
Key takeaways
A correctly installed downspout diverter requires proper height alignment, exterior-grade silicone sealant, and a clear overflow path directed at least 10 feet from the foundation.
| Point | Details |
|---|---|
| Height alignment is critical | The diverter outlet must sit at or above the barrel inlet to prevent backflow. |
| Sealant prevents long-term damage | Use exterior-grade silicone caulk on every joint to stop drips and siding stains. |
| Overflow path protects the foundation | Route overflow at least 6–10 feet from the house using a hose or pipe extension. |
| Monthly cleaning extends system life | Clear the diverter screen after every major storm to maintain consistent flow. |
| Winterization prevents cracked components | Drain barrels and store fittings indoors before any freeze event to avoid ice damage. |
