
TL;DR:
- Inside gutter corners connect gutter sections at inward building angles to prevent leaks. Proper dry-fitting and sealing with urethane ensure long-lasting, leak-free joints.
- Walking the property and choosing the right design reduces the risk of water damage and gutter system failure.
Inside gutter corners are defined as connector pieces that join two gutter sections at an inward-facing building angle, directing rainwater continuously along internal rooflines without leaking. The industry standard term for these components is “inside miter,” though homeowners commonly call them inside gutter corners. They are distinct from outside corners, which handle outward-facing angles. Standard residential sizes include 5-inch and 6-inch K-style profiles made from aluminum, vinyl, or stainless steel. For homes with L-shaped or complex floor plans, inside corners are not optional. They are the only component that keeps water moving correctly through an internal angle.
What are inside gutter corners and why do they matter?
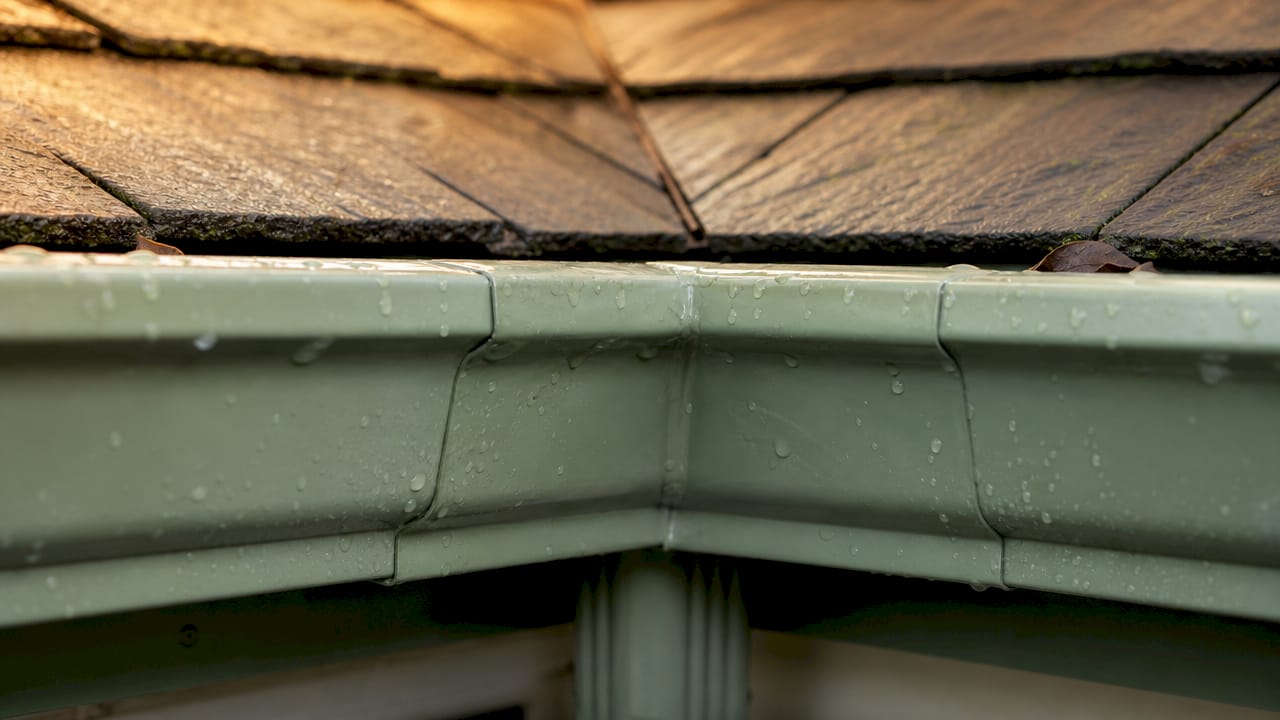
An inside gutter corner connects two gutter runs where the roofline turns inward. Think of an L-shaped house: the point where the two wings of the roof meet creates an internal angle. Without a properly fitted inside corner, water pools at that joint, seeps behind the fascia, and eventually causes wood rot or foundation damage.
Outside corners handle the opposite situation, where the roofline turns outward at a building’s exterior edge. The two components look similar but are not interchangeable. Installing an outside corner where an inside corner belongs is one of the most common purchasing mistakes homeowners make. Walking your property perimeter and counting each type of corner before buying materials prevents wasted trips to the hardware store.
Inside corners also carry more water load than straight gutter runs because roof valleys funnel water from two planes into one point. That concentration of flow makes proper fitting and sealing at inside corners more critical than at any other joint in the system.
What gutter corner types and designs are available?
Two main designs dominate the market: box miters and strip miters. Each solves the inside corner problem differently, and choosing the right one affects both leak risk and installation difficulty.
Box miters are the most common type. They are pre-formed corner pieces that slip over the ends of two gutter sections and create a sealed joint. Box miters produce two seams, one on each side of the corner. That means two potential leak points, which is why sealing technique matters so much with this design.
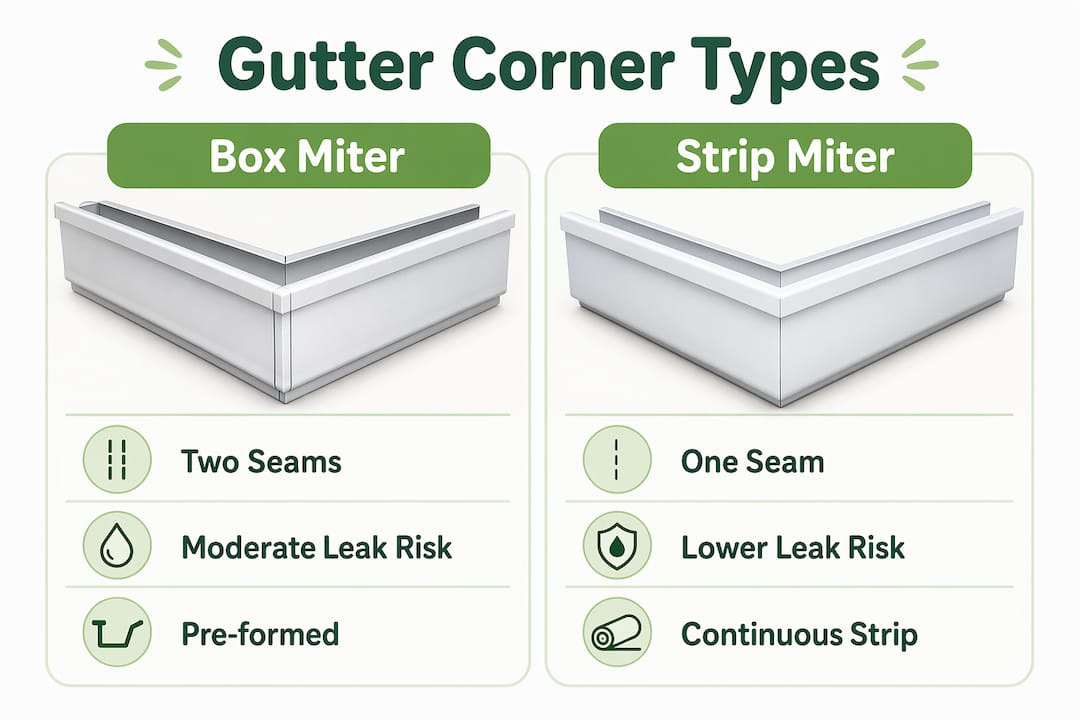
Strip miters, sometimes called bay strip miters, take a different approach. A strip miter converts a two-seam corner into a one-seam corner by using a single continuous piece that bridges the angle. Fewer seams mean fewer leak risks, making strip miters the preferred choice for roof valleys or any area with heavy water flow.
| Feature | Box miter | Strip miter |
|---|---|---|
| Number of seams | 2 | 1 |
| Leak risk | Moderate | Lower |
| Best use | Standard angles | Heavy-flow areas |
| Skill level | Beginner friendly | Intermediate |
| Common sizes | 5-inch, 6-inch | 5-inch, 6-inch |
Material choice matters as much as design. Aluminum is the most popular option because it resists corrosion and holds paint well. Vinyl costs less and installs quickly, but professional standards recommend fully sealed joints even on vinyl corners, since the material expands and contracts more than aluminum in temperature swings. Stainless steel offers the longest lifespan but costs significantly more. Most inside corners are available in profiles sized at 5, 6, 7, and 8 inches to match common gutter systems, and color options typically include white, brown, and aluminum mill finish for aesthetic matching.
How to install gutter corners correctly
Correct installation follows a clear sequence. Skipping steps, especially dry-fitting, is the leading cause of leaks at inside corners.
- Measure the angle. Confirm the corner is a true 90-degree angle. Non-standard angles require custom-cut miters.
- Cut gutter sections to length. Leave a small gap at each end to allow for thermal expansion.
- Deburr cut edges. File or sand any sharp metal edges so they seat flush inside the corner piece.
- Clean mating surfaces. Cleaning manufacturing oils and dust from both the gutter ends and the inside of the corner piece improves sealant adhesion significantly.
- Dry-fit the corner. Slide the corner onto both gutter ends without sealant. The fit should be snug with no gaps. If gaps exist, recut or adjust before proceeding.
- Apply sealant to the inside joint. Use a flexible, professional-grade urethane sealant. Apply it to the inside surface where water actually flows, not just the exterior seam.
- Seat the corner firmly. Press the corner onto both gutter ends and work out any air pockets in the sealant.
- Fasten with rivets or screws. Drive fasteners gently. Overdriving fasteners distorts metal and creates micro-gaps that leak over time.
- Seal fastener heads. Apply a small dab of sealant over each fastener head to prevent water intrusion at those points.
- Allow full cure time. Let the sealant cure completely before running water through the system. Most urethane sealants require 24 hours.
Set the correct gutter slope before fastening anything permanently. The recommended drainage slope is 1/4 inch to 1/2 inch per 10 feet of gutter run. Too little slope and water sits in the gutter. Too much and water overshoots the downspout opening.
Pro Tip: Never use sealant to fix a poor fit. Sealant waterproofs a good joint. It cannot structurally correct a gap caused by a bad cut or wrong-sized corner. If the dry-fit shows a gap, stop and fix the fit first.
For a broader look at the full installation process, the gutter installation step guide from Larrysgutters covers the complete system from fascia prep to downspout connection.
Maintenance tips and common issues with inside gutter corners
The most common problem at inside gutter corners is leaking. The cause is almost never the corner piece itself. Inadequate seam preparation and failure to accommodate thermal expansion account for the vast majority of corner leaks. That distinction matters because it means the fix is almost always a resealing job, not a full corner replacement.
Watch for these warning signs during routine inspections:
- Water dripping or staining directly below a corner joint
- Visible separation between the corner piece and the gutter end
- Sealant that has cracked, pulled away, or turned brittle
- Rust streaks on aluminum corners, which signal moisture trapped at the joint
- Sagging at the corner, which indicates the fascia behind it may already be damaged
Pro Tip: Inspect inside corners after every major storm. Florida’s heavy rainfall puts corners under stress that gradual seasonal checks can miss. Catching a failing seal early costs far less than replacing rotted fascia boards.
Regular cleaning also protects corners. Debris accumulates at inside corners faster than anywhere else in the gutter system because the angle creates a natural collection point. Clogged corners back up water, which increases pressure on the joint and accelerates seal failure. Clean gutters at least twice a year, and check inside corners specifically for debris buildup.
Avoid the temptation to pile on extra sealant as a fix for recurring leaks. Excess sealant traps debris and moisture, which speeds up deterioration. The right approach is to remove old sealant completely, clean the surface, and apply a fresh, properly sized bead of urethane sealant. Understanding what causes gutter leaks at the joint level helps you fix the actual problem rather than masking it.
How to tell inside corners apart from other gutter components
Inside and outside corners look nearly identical at first glance. The difference is in the direction the angle opens. An inside corner opens toward the building. An outside corner opens away from it. Hold the piece up and look at the angle: if it points inward like the inside of a bowl, it is an inside corner.
| Feature | Inside corner | Outside corner |
|---|---|---|
| Angle direction | Faces inward toward building | Faces outward away from building |
| Typical building type | L-shaped, U-shaped homes | Most rectangular homes |
| Water flow role | Collects water from two roof planes | Redirects water around a building edge |
| Installation complexity | Higher, due to water volume | Moderate |
L-shaped buildings require inside corners where the wings of the structure meet. Rectangular buildings generally need only outside corners. Before purchasing any corner pieces, walk the full perimeter of your home and physically count each type of angle. Write the count down. Guessing leads to buying the wrong quantity or the wrong type.
Inside corners are also distinct from end caps, which seal the open ends of gutter runs, and from downspout outlets, which are the drop points where water exits the gutter. Knowing these components by name makes purchasing and repair conversations much easier, whether you are at a hardware store or talking to a contractor.
Key takeaways
Inside gutter corners are the most leak-prone joints in any gutter system, and proper dry-fitting combined with urethane sealant applied to the inside surface is the only reliable way to prevent failure.
| Point | Details |
|---|---|
| Definition and function | Inside corners connect gutter sections at inward building angles to direct rainwater without leaking. |
| Two main designs | Box miters create two seams; strip miters create one, making strip miters better for high-flow areas. |
| Installation sequence | Dry-fit before sealing. Sealant waterproofs a good fit. It cannot fix a bad one. |
| Primary leak cause | Poor seam prep and thermal expansion gaps cause most leaks, not the corner piece itself. |
| Identification tip | Walk the full building perimeter and count inside versus outside angles before buying any materials. |
What I have learned from watching corners fail
After seeing hundreds of gutter systems across Central Florida, the pattern is clear: most inside corner failures trace back to two decisions made in the first five minutes of installation. The first is skipping the dry-fit. The second is reaching for sealant before the fit is confirmed.
Homeowners often assume that more sealant equals more protection. The opposite is true. A thick bead of sealant over a poor fit traps moisture, holds debris, and eventually cracks. A thin, even bead over a well-fitted joint lasts years. The corner piece is almost never the problem. The prep work is.
The other mistake I see constantly is mixing corner types on the same building. Someone buys a mix of inside and outside corners without walking the property first, then figures it out on the ladder. That leads to forced fits, overdriven fasteners, and leaks within one rainy season. Spending ten minutes with a notepad before buying saves hours of rework.
My honest recommendation: if your home has more than two inside corners, or if any of them sit at a roof valley, use strip miters instead of box miters. The single-seam design is not significantly harder to install, and the reduction in leak risk is real. For anyone unsure about their specific layout, Larrysgutters offers resources and professional guidance that remove the guesswork from corner selection and installation.
— Larrysgutters
Gutter corner resources from Larry’s Gutters
Getting inside gutter corners right the first time protects your home from water damage that compounds quickly in Florida’s climate. Larrysgutters provides step-by-step guidance for homeowners who want to handle installation themselves and professional service for those who prefer expert hands on the job.

The complete gutter installation guide covers every stage from measuring and cutting to sealing and slope-setting, with specific attention to corner fitting. For homes where the downspout connects directly at or near an inside corner, the downspout installation steps guide walks through that connection in detail. Both resources are built for Central Florida conditions, where heavy rainfall puts every joint under real pressure.
FAQ
What is an inside gutter corner?
An inside gutter corner, also called an inside miter, is a connector piece that joins two gutter sections at an inward-facing building angle. It keeps rainwater flowing continuously through the system without leaking at the joint.
How do box miters and strip miters differ?
Box miters create two seams at the corner joint, while strip miters reduce this to one seam, lowering leak risk in high-flow areas like roof valleys.
What causes leaks at inside gutter corners?
Inadequate seam preparation and thermal expansion gaps cause most inside corner leaks. The corner piece itself is rarely the problem.
How do I know if I need an inside or outside corner?
Walk your building perimeter and look at each angle. Angles that face inward toward the building require inside corners. Angles that face outward require outside corners.
How often should I inspect inside gutter corners?
Inspect inside corners at least twice a year and after every major storm. Catching a failing sealant joint early prevents fascia rot and foundation damage from water intrusion.
