
TL;DR:
- A gutter diverter directs rainwater away from vulnerable areas or into rain barrels for collection, serving targeted water management. Proper installation involves sealing flange edges and positioning downspout diverters above the barrel height to ensure effective gravity flow. Materials like aluminum resist Florida’s climate, follow-up maintenance prevents leaks, and professional help is recommended for safety or complex setups.
A gutter diverter is a device installed on your roof or downspout that redirects rainwater flow away from vulnerable areas of your home, and it can double as a collection point for rain barrels. Explaining gutter diverter installation properly means covering two distinct devices: the roof rain diverter, which sits under shingles to channel runoff away from doorways and valleys, and the downspout diverter, which taps into your existing downspout to fill a rain barrel. Both are made from aluminum or galvanized steel, both serve targeted water management goals, and both are realistic DIY projects when you follow the right sequence. This guide walks you through every step, from tool prep to final sealing, so you protect your home and avoid the mistakes that cause leaks.
How to install a gutter diverter on your roof
Roof rain diverter installation is best done on dry, calm days because wet shingles become dangerously slippery and wind makes precise placement nearly impossible. Trinity Inspections recommends letting sunlight warm the shingles slightly before you start, which makes them more pliable and reduces the risk of cracking when you lift them. Gather your tools before climbing: a flat pry bar, roofing screws or nails, a caulk gun loaded with roofing sealant, a tape measure, and the diverter itself. Match the diverter width to the specific problem area you are addressing, whether that is a doorway, a roof valley, or a low-slope section prone to pooling.
Follow these steps in order:
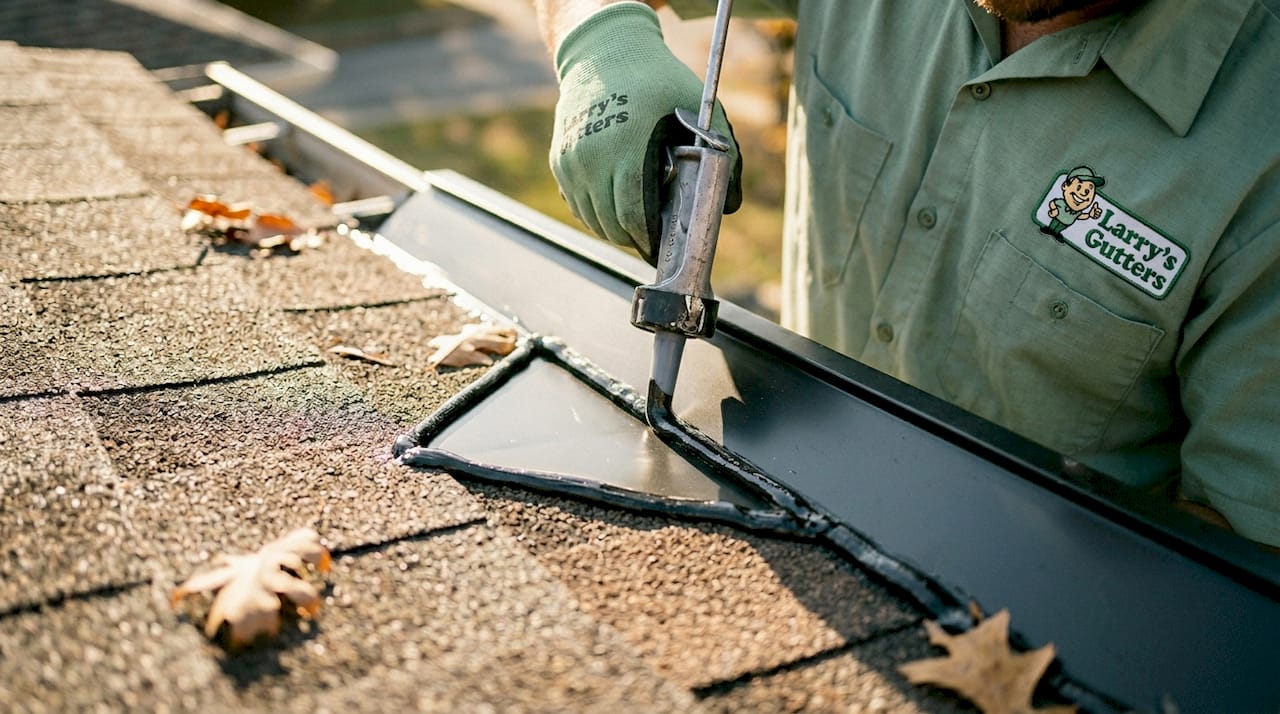
- Lift the shingles carefully. Slide a flat pry bar under the shingle row directly above where the diverter flange will sit. Work slowly to avoid cracking. Older shingles are more brittle, so take extra time here.
- Clean the surface. Remove any debris, moss, or old sealant from the roof deck beneath the lifted shingles. A clean surface is what makes the flange lie flat and seal properly.
- Slide the flange into position. Push the diverter’s top flange under the lifted shingles so it sits snug against the roof deck. The channel portion of the diverter should angle away from the house toward the intended drainage point.
- Secure with roofing fasteners. Drive roofing screws or nails through the flange and into the roof deck, spacing fasteners every 6 inches along the top edge. This spacing prevents the flange from lifting under heavy rain pressure.
- Seal the top edge. Apply a continuous bead of roofing sealant along the entire top edge of the flange where it meets the shingles above. This step is what separates a leak-free installation from one that fails in the first storm.
- Press shingles back down. Lay the lifted shingles flat over the flange and press firmly. If any shingle tabs were nailed previously, re-nail them.
Pro Tip: Match your diverter length to the full width of the problem area, not just the center. A diverter that is too short leaves the edges exposed, and water will find those gaps immediately during a Florida downpour.
One common error is skipping the sealant step because the flange looks tight. Small gaps at the flange-to-shingle interface allow water to bypass the diverter entirely, defeating its purpose and potentially soaking the roof deck below. Sealant is not optional.
How to install a downspout diverter for rain barrel collection
A downspout diverter setup connects your existing gutter system to a rain barrel, giving you a free water source for irrigation while keeping overflow under control. Common downspout sizes are 2"x3" or 3"x4", so confirm your measurement before buying a diverter kit. Most kits include the diverter body, a hose for the barrel connection, and the hardware needed to secure everything. For proper gutter downspout integration, the diverter must sit several feet above the barrel’s inlet so gravity pulls water down through the hose without any pumping.
Here is the installation sequence:
- Mark the cut location. Position your rain barrel where it will sit permanently, then measure up the downspout to a point that is at least 2 feet above the barrel’s inlet. Mark a horizontal cut line at that height.
- Cut the downspout section. Use tin snips or a hacksaw to remove a section of downspout matching the height of your diverter body. Most diverter kits specify the exact cut length, typically 3 to 4 inches.
- Attach the diverter body. Slide the diverter into the gap in the downspout and secure it with gutter screws on both the upper and lower connections. The diverter has two outlets: one that routes water to the barrel and one that continues down the original downspout for overflow.
- Connect the hose to the barrel. Run the diverter’s outlet hose from the diverter to the rain barrel’s inlet screen. Keep the hose as straight as possible. Kinks reduce flow and can cause the diverter to back up during heavy rain.
- Check the overflow path. The downspout diverter automatically routes excess water back through the lower downspout once the barrel fills. Confirm that lower section of downspout is still intact and directs water away from your foundation.
- Test with a garden hose. Run water from a hose into the gutter above and watch the diverter fill the barrel. Check every connection point for drips and tighten any loose screws.
Pro Tip: Position the rain barrel on a flat, stable platform raised 12 to 18 inches off the ground. The extra elevation increases water pressure at the spigot, which makes using the barrel for garden irrigation noticeably easier.
Diverter positioning above the rain barrel is the single most important factor in making the gravity-feed system work reliably. If the diverter sits at the same height as the barrel inlet, water stalls in the hose and the barrel never fills correctly.

Gutter diverters vs. full gutter systems: which do you need?
Roof rain diverters address specific problem runoff spots and do not replace gutters, which protect the entire roof perimeter. Understanding this distinction saves you from installing a diverter where a gutter is actually needed, or paying for a full gutter run when a targeted fix would solve the problem. For a deeper look at how these two solutions compare in Central Florida specifically, the diverters vs. gutters breakdown at Larrysgutters covers local rainfall patterns and when each approach makes the most sense.
| Feature | Gutter diverter | Full gutter system |
|---|---|---|
| Coverage area | Targeted spot (doorway, valley, porch) | Entire roofline perimeter |
| Best use case | Redirecting concentrated runoff | Collecting and channeling all roof drainage |
| Installation complexity | Low to moderate DIY | Moderate to high, often professional |
| Cost | Low (most kits under $50) | Higher, varies by linear footage |
| Works with rain barrels | Yes, downspout type directly | Indirectly, via downspout diverter add-on |
| Replaces the other | No | No |
The table makes one thing clear: these two solutions work best together. A home with a full gutter system can still benefit from a roof rain diverter at a covered entryway where water cascades off a lower roof section. Conversely, a diverter alone cannot protect a foundation from the volume of water a full roofline sheds during a Florida thunderstorm. Think of diverters as precision tools within a broader water management plan, not standalone replacements.
Materials, maintenance, and pitfalls to avoid
Choosing the right material for your diverter affects how long it lasts, especially in Florida’s humid, salt-air climate.
- Aluminum resists rust and stays lightweight, making it the preferred choice for most residential installations. It handles Florida’s humidity without corroding and is easy to cut to length if needed.
- Galvanized steel offers greater rigidity and handles physical impact better, which matters in areas with falling branches or heavy debris. It can rust over time if the galvanized coating is scratched during installation.
- Plastic diverters are generally discouraged for outdoor use. UV exposure degrades plastic quickly in Florida’s sun, and plastic becomes brittle within a few seasons, leading to cracks at fastener points.
The choice between aluminum and galvanized steel comes down to your specific exposure conditions. Aluminum wins for most Florida homeowners because rust resistance outweighs the marginal rigidity advantage of steel.
Maintenance is straightforward but must be consistent:
- Clear debris from the diverter channel after every major storm. Leaves and pine needles block the channel and force water to back up under shingles.
- Inspect sealant along the flange top edge every six months. Florida’s heat cycles cause sealant to shrink and crack faster than in cooler climates.
- Check all gutter screws at diverter connection points annually. Vibration from heavy rain loosens fasteners over time.
- Examine the hose connecting a downspout diverter to a rain barrel each spring. Look for kinks, cracks, or loose fittings at both ends.
DIY installation pitfalls often include improper sealing and hasty assembly, both of which cause leaks that are hard to trace back to the source. Meticulous alignment and thorough sealing of every seam dramatically improve reliability and lifespan. For additional guidance on avoiding water damage through proper installation, home water protection tips from Hunt Home Inspection offer a useful checklist that applies directly to gutter work.
Pro Tip: Walk your roofline and inspect every diverter within 24 hours after the first heavy rain following installation. Early detection of a drip or bypass lets you add sealant before any moisture reaches the roof deck.
Key takeaways
Proper gutter diverter installation requires matching the device to the problem, sealing every flange edge, and positioning downspout diverters above barrel height for reliable gravity flow.
| Point | Details |
|---|---|
| Install on dry, calm days | Wet or windy conditions make roof work dangerous and reduce installation precision. |
| Seal every flange edge | Sealant along the top flange edge prevents water bypass, the most common failure point. |
| Match diverter to downspout size | Use 2"x3" or 3"x4" diverter kits to match your existing downspout for a leak-free fit. |
| Diverters supplement gutters | Diverters fix targeted runoff problems; full gutter systems handle whole-roofline drainage. |
| Inspect after every major storm | Clearing debris and checking sealant after storms extends diverter lifespan significantly. |
What I’ve learned from watching diverter installations go wrong
Most DIY gutter diverter failures I have seen come down to one thing: rushing the sealing step. Homeowners get the flange positioned perfectly, drive every screw at the right spacing, and then skip the sealant because the fit looks tight. It never is tight enough. Rooflines flex, shingles shift with temperature, and the first hard rain finds every gap that the eye missed.
The second pattern I notice is undersizing. A diverter that covers 80% of a problem area still leaves 20% of the water going exactly where you do not want it. Measure the full width of the runoff zone, not just the center, and buy a diverter that covers it completely.
For Florida homeowners specifically, material choice is not a minor detail. Aluminum holds up in the humidity and heat in a way that plastic simply cannot. I have seen plastic downspout diverters crack within two summers in Central Florida. Spend a few extra dollars on aluminum and you will not be replacing it in 18 months.
If you are uncertain about working on your roof, that uncertainty is worth respecting. A professional gutter installation takes the risk off your hands and gets the sealing right the first time. There is no shame in knowing where your comfort level ends.
— Larrysgutters
Let Larrysgutters handle your gutter system the right way
Installing a gutter diverter yourself is absolutely doable, but getting every seal and fastener right on a Florida roofline takes experience. Larrysgutters specializes in residential gutter solutions across Central Florida, from full seamless gutter installation to targeted diverter setups designed for the region’s heavy rainfall and unpredictable storm seasons.

Larrysgutters uses quality aluminum materials, professional-grade sealants, and custom-fit systems built for Florida homes. Whether you need a downspout diverter added to an existing system or a complete gutter overhaul, the team provides free estimates and straightforward advice. Contact Larrysgutters today to protect your home before the next storm season arrives.
FAQ
What is a gutter diverter used for?
A gutter diverter redirects rainwater away from vulnerable areas like doorways, porches, and roof valleys, or channels it into a rain barrel for collection. It is a targeted fix for concentrated runoff problems, not a replacement for a full gutter system.
How do I know which diverter size to buy?
Measure your downspout before purchasing. The two standard sizes are 2"x3" and 3"x4", and your diverter kit must match your existing downspout dimensions exactly to prevent leaks at the connection points.
Can I install a gutter diverter without professional help?
Yes. Both roof rain diverters and downspout diverters are DIY-friendly projects, provided you work on a dry, calm day and follow proper sealing steps. If you are uncomfortable working on a roof, a professional installation removes the safety risk entirely.
Why is my gutter diverter leaking after installation?
The most common cause is an unsealed or under-sealed flange edge. Apply a continuous bead of roofing sealant along the full top edge of the flange and check that all fasteners are driven flush with no gaps between the flange and the roof deck.
How often should I maintain my gutter diverter?
Clear debris from the channel after every major storm and inspect the sealant every six months. In Central Florida’s heat, sealant degrades faster than in cooler climates, so semi-annual checks prevent small cracks from becoming active leaks.